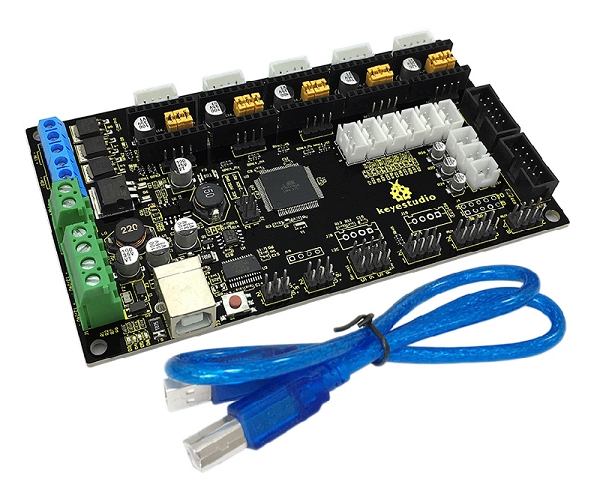
3D MKS Gen V1.4 Printer Motherboard Control Board
Product Link
Intruduction
OpenELAB 3D MKS Gen V1.4 printer motherboard control board combines and improves the assets solutionof the RAMPS 1.4 and Arduino Mega 2560 board on a fantastic single board. OpenELAB 3D MKS Gen V1.4 printer motherboard control board is an optimal 3D printer controller solution for your Reprap 3D printer.
Features
Integrate 2560 and ramps1.4 in a board, to solve thecomplicated interfaces and broken problem of Ramps1.4 combination.
Replaceable motor driver, support 4988 driver and 8825 driver.
Circuit board using high-quality 4-layer board, and specially dealing with thermal optimization; ramps is a 2-layer board.
Using high-quality MOSFET tube, with better heat dissipation.
Using a dedicated power chip to support 12V-24V power input, to solve the problem of Ramps voltage converted into chip heating.
To accept 24V input, hot bed current can be reduced to 1/4 under the same system power, effectively solve the heating problem of hot bed MOS tube.
Firmware can use open-source firmware Marlin, and its configuration is exactly the same as ramps1.4, which can directly replace Ramps1.4.
Can directly connect to Ramps1.4,2004LCD control board and 12864LCD control board.
Set aside the motor pulse and direction output port, convenient to facilitate external high current to connect external high current (such as 2A, 5A) motor drive circuit.
Reserve the Servos, AUX-1, AUX-2 interfaces on Ramps1.4, providing three 5V output, three 12V output interface.
This board is an upgrade part of the MKS Gen V1.2 board, improving the performance of power protection and USB communication stability.
Interface Explanation

Shipping List
OpenELAB MKS BaseV1.4 3D Printer Controller Board
USB Cable
Using Method
Install Diver Software
Connect the main board with computer, and then right click “Computer” to enter “Device Manage”
Double click “Other devices”, appearing “USB Serial Port”.
Then, right click “USB Serial Port” and select “Update Driver Software” to install driver software.
After that, select “Browse my computer for driver software” to find the file.
Browse to search for driver software.
After your driver software updated, click “Close” to finish.
Finally, installation is done, and double click “Ports”in “Device Manager”, you can see “USB Serial Port”.
Install development environment software IDE
Double click arduino-1.5.6-r2-windows to start.
Select “I Agree”to accept license agreement.
Select components to install and click “Next”.
Click “Browse” and select another folder. Click “Install” to start the installation.
Finally, wait for a few minutes to finish.
Install Firmware for Main Board
You must close Arduino IDE firstly, and then place three libraries LiquidCrystal, SPI and U8glib from Marlin_Marlin_v1 → ArduinoAddons → Arduino_1.x.x → libraries into Arduino/libraries.
Enter Marlin_Marlin_RAMPS_2004_Ver1 this folder, double click Marlin_Marlin_RAMPS_2004_Ver1.ino this file, finally click “Tools” to set “Board”and “Port”.
After verifying, write code.
Done uploading.
After upload the firmware the LCD will display some parameter as shown below:
Install Slicer Software Repetier-Host
First, run this application


Click “Next” to continue.
Check “I accept the agreement”, and click “Next” to continue.
Select destination location, and click “Next” to continue.
Check components that should be installed, and click “Next” to continue.
Select star menu folder, and click “Next” to continue.
Click “Next” to continue.
Click “Install” to install.
Click “Finish” to exit Setup.
Application of Slicer Software
a. Run Repiter-Host,click Load to open a printing model.
b. Click Printer Settings to complete some setup, referring to below figure.
c. Enter Object Placement to set placing position, printing size and so on.
d. Click Slicer to set slicer, like printing speed. After setting slicer, click Start Slicing to begin slicing.
e. After slicing, go to Preview→G-Code Editor, copy G-Code to SD card, and then insert the card into the main board. It is time to kick off the print! Though the LCD screen go to: Print from SD→Desired File. Or you can connect your 3D printer to computer using a USB cable to start the print.
f. Click “Connect”and then click “Start Print” to begin the print. After some time, your printer gets ready and the buzzer rings, then you should press the button on LCD to start.
g. We just introduce a simple method about printing. Thanks to selling only main board by us, you should design your own structure and outlook of your 3D printer, and you should also set your own configuration to meet your need. After you assembling your printer, the printer need to be leveled, so you can make some setup in Preview and Manual Control, and surf the internet for further information.
h. We have a G-Code to test the main board. Power it on, open limit switch and stepper motor, drive three motors; put a Fnbduino.gco file to Preview, click Start Print, if the motors rotate, X/Y/Z value in Manual Control changes, the main board works as shown below:
Last updated
Was this helpful?