Waveshare 10.1 inch IPS Capacitive Touch LCD
Waveshare 10.1 inch IPS Capacitive Touch LCD
Product Link
Feature
10.1-inch IPS screen with 1024 × 600 resolution
10-point capacitive touch control, tempered glass panel with a hardness up to 6H
When used with Raspberry Pi, it supports Raspberry Pi OS / Ubuntu / Kali and Retropie
When used as a computer monitor, it supports Windows 11/10/8.1/8/7
When used with Tinker Board 2, it supports Android / Debian
Ubuntu is supported when used with Jetson Nano
Support common game consoles such as Microsoft XBOX360 and Nintendo switch
Support various video input interfaces: HDMI, VGA, and AV (CVBS)
Support multi-language OSD menu (can be used for power control, adjusting brightness/contrast, etc.)
Working with RPI
Software Setting
Supports Raspberry Pi OS / Ubuntu / Kali and Retropie systems on Raspberry Pi.
Please download the latest version of the image from the Raspberry Pi official website.
1. Download the compressed file to the PC, and extract the img file. 2. Connect the TF card to the PC and use SDFormatter to format the TF card. 3. Open the Win32DiskImager software, select the system image prepared in step 1, and click write to burn the system image. 4. After the programming is completed, open the config.txt file in the root directory of the TF card, add the following code at the end of config.txt and save it.
Hardware connection
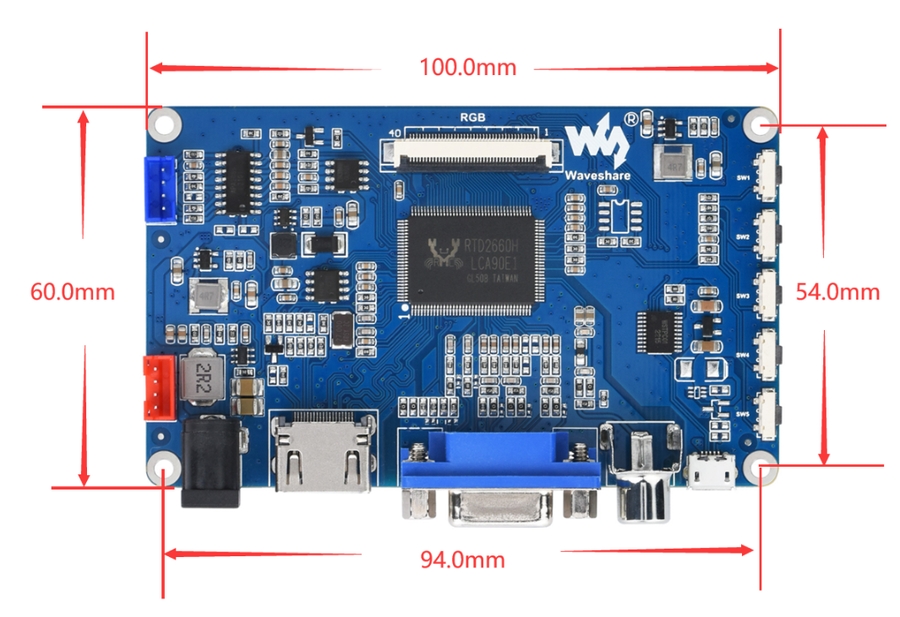
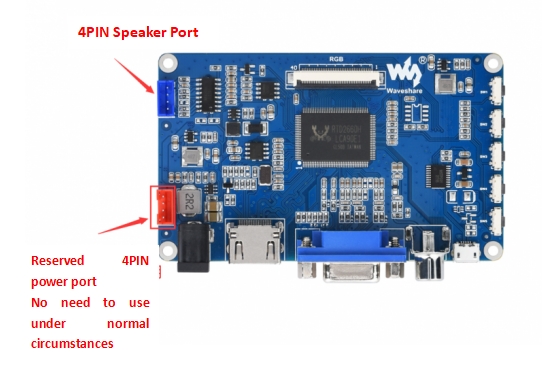
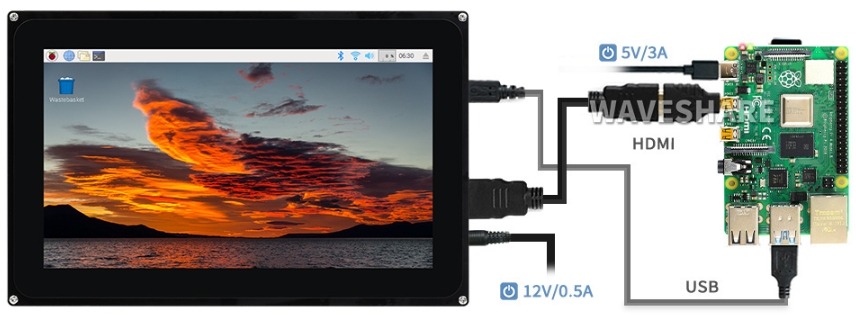
Connect the HDMI main control board to the RGB interface of the 10.1inch Capacitive Touch LCD (F) with a 40pin FFC cable.
Connect the HDMI port of the board to the Raspberry Pi.
Connect the Touch interface of the board to the USB interface of the Raspberry Pi.
Connect the board to the 12V power adapter.
Insert the TF card into the Raspberry Pi and connect the power adapter with 5V/3A.
The hardware connection is shown in the following figure:
Using Steps
Power on the main control board first. Generally, you can see that the upper left corner of the LCD will display the signal source. Here you need to choose HDMI.
If the displayed signal source is VGA or AV, you need to press the "Source" button to choose one of them.
If there is no signal in the LCD, please check the hardware connection, especially the FFC cable.
Power on the Raspberry Pi, please wait for a few seconds, and you can see the LCD display normally.
Working with PC
Supports PC Windows 11/10/8.1/8/7.
Hardware Connection
Connect the HDMI main control board to the RGB interface of the 10.1inch Capacitive Touch LCD (F) with a 40pin FFC cable.
Connect the HDMI port of the LCD to the PC.
Connect the Touch interface of the LCD to the USB interface of the PC.
Connect the main control board to the 12V power adapter.
Using Steps
Power on the main control board first. Generally, you can see that the upper left corner of the LCD will display the signal source of the board. Here you need to choose HDMI.
If the displayed signal source is VGA or AV, you need to press the "Source" button to choose one of them.
If there is no signal in the LCD, please check the hardware connection, especially the FFC cable.
Power on the Raspberry Pi, wait a few seconds, and you can see the LCD display normally.
Notice:
1) When the PC is connected to multiple monitors at the same time, the touch effect works on the main screen by default. If you need to specify the touch to the other screen, see #Calibrate Touch on Win 10 PC.2) Some PCs do not support plug-and-play with HDMI devices. Generally, they can be used normally after restarting the system.
Calibrate Touch on Win 10 PC
Take the windows10 system as an example:
1. Enter the Windows settings of the system, type in the search bar and click "Calibrate the screen for pen or touch input" (as shown in the picture below)

2. Click "Setup" in the pop-up "Tablet PC Settings" interface:
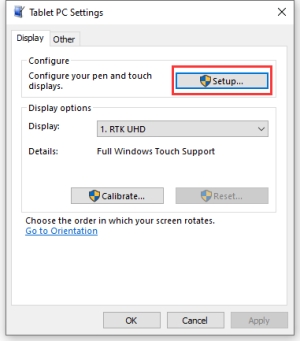
3. The following text prompt will appear on the screen. Please tap the touch screen with your finger, and the computer will recognize it as a touch screen.
【Note】If the touch screen is blank, press the "Enter" key, and the text prompt will switch to the touch screen. (The screen which displays the text prompt will be used as a touch screen!)

Working with Tinker Board 2
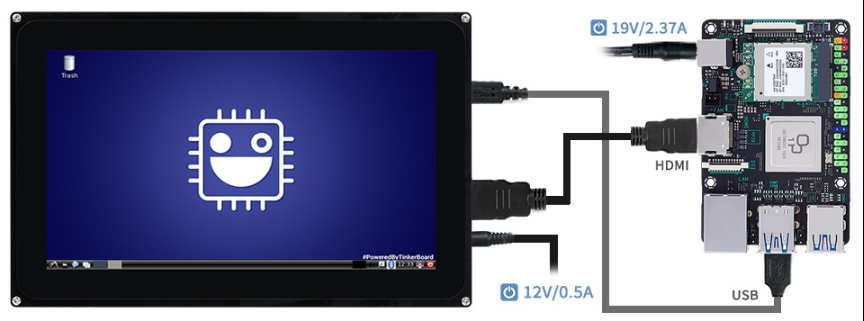
Hardware Connection
Connect the HDMI host control board to the RGB interface of the 10.1inch Capacitive Touch LCD (F) with a 40pin FFC cable.
Connect the HDMI port of the LCD to the PC.
Connect the Touch interface of the LCD to the USB interface of the PC.
Connect the board to the 12V power adapter.
The hardware connection is shown in the following figure:
Software Setting
Supports Android and Debian systems for Tinker Board 2. 1. Please download the latest version of the image from the Tinker Board official website. 2. Connect the TF card to PC, and use SDFormatter to format the TF card. 3. Open the Win32DiskImager software, select the system image prepared in step 1, and click write to burn the system image. 4. After the programming is completed, insert the TF card to Tinker Board 2 and power on. You can see it display normally after waiting for a few seconds.
Key Function
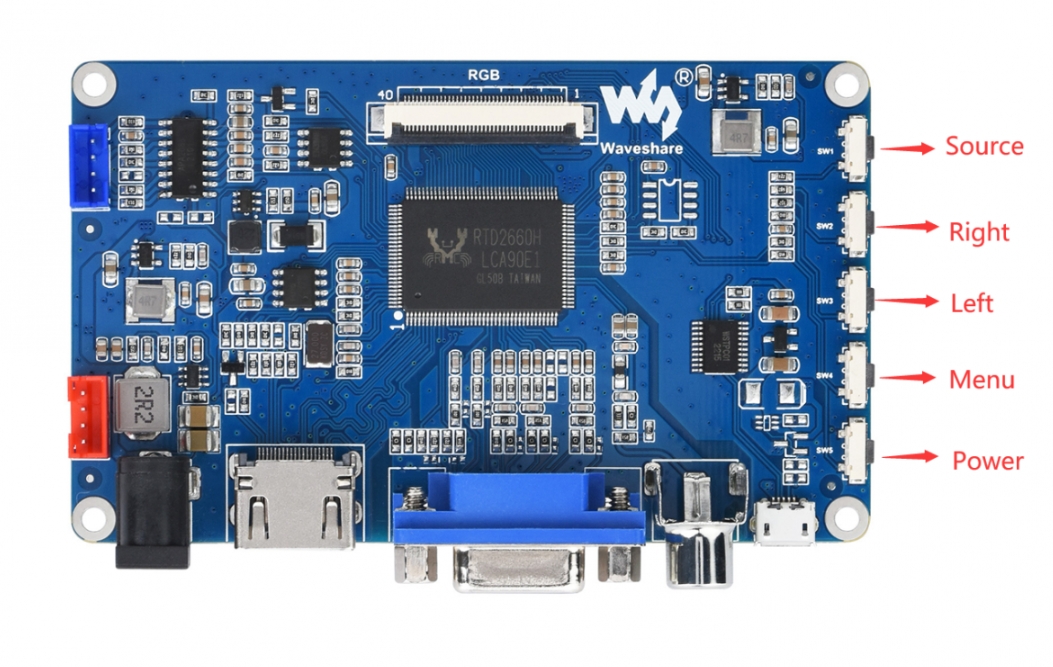
Source button: When using it for the first time, you need to configure the corresponding signal source (when using the menu, this button also has a "return" function).
Right button: Arrow keys.
Left button: Arrow keys.
Menu button: open the menu (when using the menu, this button also has the "OK" function).
Power button: turn on or off the LCD display.
Resource
FAQ
Last updated
Was this helpful?

