Waveshare 7.9 inch IPS LCD Touch Screen, 400×1280 HDMI
Waveshare 7.9 inch IPS LCD Touch Screen, 400×1280 HDMI
Product Link
Description
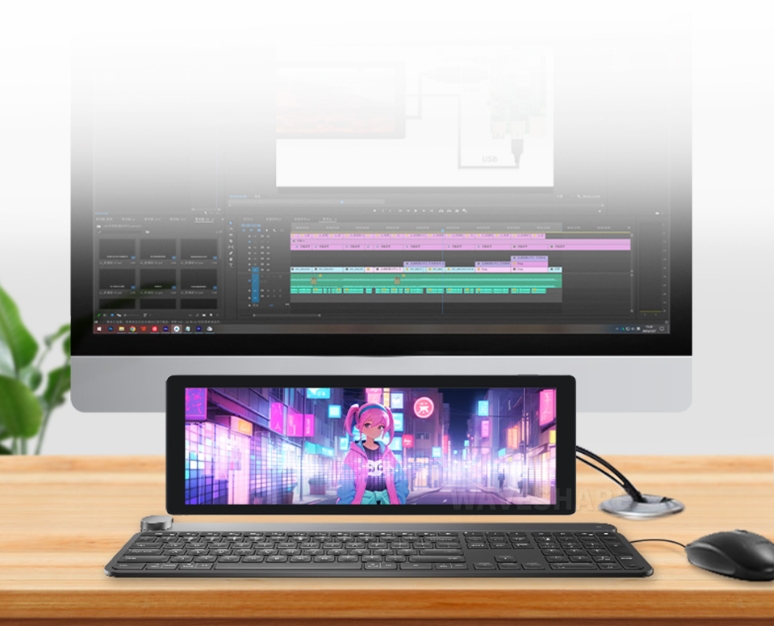
This product is a universal 7.9-inch HDMI display with a resolution of 400×1280. It can be used as a sub-display for the chassis and also supports Raspberry Pi and Jetson Nano.
Features
7.9-inch IPS screen, hardware resolution is 400×1280
Zinc alloy shell, tempered glass panel, hardness up to 6H
When used as a computer monitor, it supports Windows 11 / 10 / 8.1 / 8 / 7, driver-free
When used with Raspberry Pi, it supports Raspberry Pi OS / Ubuntu / Kali and Retropie, driver-free
When used with Jetson Nano, it supports Ubuntu and is driver-free.
Support backlight control, more power saving
Support 5-point capacitive touch control (touch version only)
Product Parameters
project
describe
unit
Product number
7.9inch Monitor
size
7.9
Inch
Viewing angle
170
You
Resolution
400×1280
Pixels
physical dimension
211.00(H)×73.00(V)×20.00(D)
mm
Display area
191.08(H)×60.40(V)
mm
IPS version color gamut
62%NTSC
Maximum brightness
550
cd/m²
Backlight adjustment method
Support physical dimming by button/HID software dimming
Contrast
900:1
Color Depth
16.7M
Refresh rate
60
Hz
Power supply interface
USB Type-C
Display Interface
HDMI interface
Electrical Specifications
parameter
Minimum
standard value
Maximum
unit
Note
Input voltage
4.75
5.00
5.25
IN
Note 1
Input Current
500
500
TBD
mA
Note 2
Operating temperature
0
25
60
℃
Note 4
storage temperature
-10
25
70
℃
Note 4
•Note 1: Input voltage exceeding the maximum value or improper operation may cause permanent damage to the device. •Note 2: Input current must be ≥500mA, otherwise it will cause startup failure or abnormal display. Long-term abnormal state may cause permanent damage to the device. •Note 3: Please do not store the display in a high temperature and high humidity environment for a long time. The display must work within the limit value range, otherwise the display may be damaged.
Use with PC
Supports Windows 11 /10 / 8.1 / 8 / 7 systems.
Instructions:
1) Connect the LCD's TOUCH port to the PC's USB port.2) Connect the LCD's HDMI port to the PC's HDMI port.Note: This product is displayed in portrait mode by default, and the resolution (H×V) is 400×1280. You can change the software settings to horizontal mode.
Backlight control
You can control the backlight brightness by long pressing the switch button on the side of the LCD.

AIDA64 Setup Tutorial
① Hardware connection:
Use a USB cable to connect the USB port of the host to the power port on the side of the screen for power supply
Use an HDMI cable to connect the HDMI port of the host to the HDMI port on the side of the screen for display.

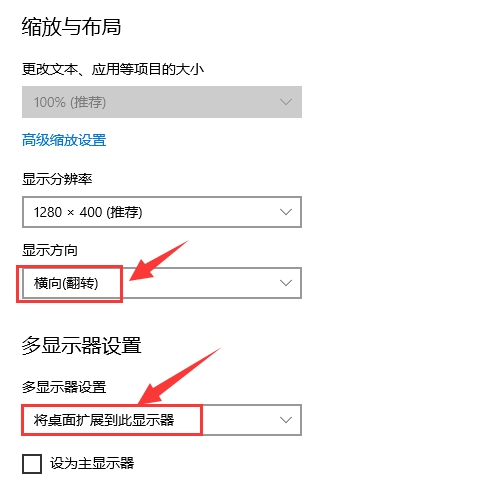
② Computer display settings:
Right click on the computer desktop to enter "Display Settings"

Select the corresponding display

Adjust the display orientation to landscape and set the display mode to "Extend these displays" ③ AIDA64 software settings
Download AIDA64 software from https://download.aida64.com/aida64extreme633.zip , unzip and open the aida64.exe application
Right click to open the "AIDA64" software icon in the taskbar and enter "Show Sensor Information Panel"
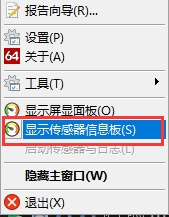
Right-click the blue area that pops up and enter the "Manage Sensor Dashboard"
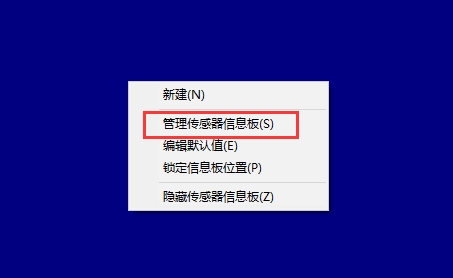
Import the engineering template provided by Weixue and drag the "Sensor Information Board" to the secondary screen to complete the setting.


Use with Raspberry Pi
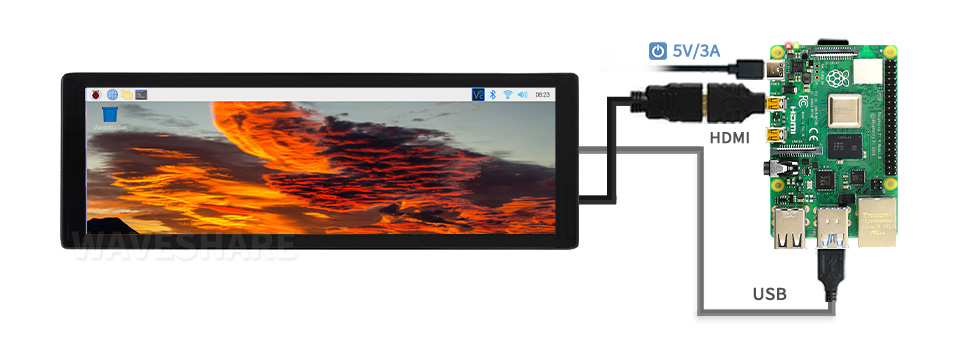
Hardware Hookup
Use a USB cable to connect the Type-C port of the screen to the Raspberry Pi for power supply and touch function (only the touch version has touch function)
Use an HDMI cable to connect the HDMI port of the screen to the Raspberry Pi for display.
Software Setup
Supports Raspberry Pi OS / Ubuntu / Kali and Retropie systems.
When the LCD works on systems such as Raspberry Pi, the resolution must be set manually, otherwise it will cause display abnormalities.
1. Please download the latest version of the image from the Raspberry Pi official website . Download the compressed file to your PC and decompress it to get the .img file.2. Connect the TF card to the PC and use SDFormatter software to format the TF card.3. Open the Win32DiskImager software, select the system image prepared in step 1, and click write to burn the system image.4. After the burning is completed, open the config.txt file in the root directory of the TF card, add the following code at the end of config.txt, save it and eject the TF card safely.
5) Connect the LCD's TOUCH port to the Raspberry Pi's USB port.6) Connect the LCD's HDMI port to the Raspberry Pi's HDMI port, power on the Raspberry Pi, and wait for a few seconds before the display starts to function normally.Note: This product is in portrait mode by default, with a resolution (H×V) of 400×1280. You can change the software settings to landscape mode, see #Rotation for details .
Display Rotation
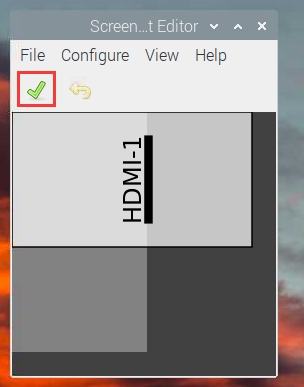
If you are using the Bullseye/Buster system, you can rotate it in the following ways:
1. Enter Screen Configuration.

2. Set the rotation as shown below.


If you are using another version system, you can rotate it as follows:
1. Add the following statement to the config.txt file (the config file is located in the root directory of the TF card, i.e. /boot):
2. Save and restart the Raspberry Pi
Touch to rotate
Since the touch direction is inconsistent after rotation, you need to follow the steps below to perform touch rotation: 1. Install libinput
If you installed Ubuntu system or Jetson Nano. The installation instructions are:
2. Create the xorg.conf.d directory under /etc/X11/ (if the directory already exists, proceed directly to step 3)
3. Copy the 40-libinput-conf file to the directory just created
4. Edit the file
Find the touchscreen part, add the following statement in it, and then save it.
Similar to the following picture: 5. Restart the Raspberry Pi
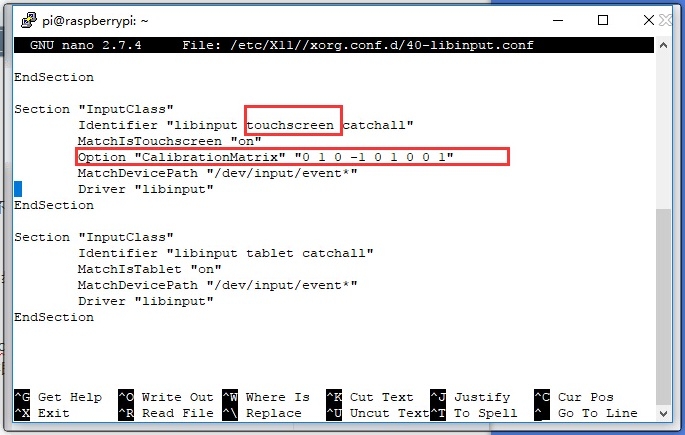
Complete the above steps to perform a 90-degree rotation. Note: 90-degree rotation: Option "CalibrationMatrix" "0 1 0 -1 0 1 0 0 1" 180-degree rotation: Option "CalibrationMatrix" "-1 0 1 0 -1 1 0 0 1" 270-degree rotation: Option "CalibrationMatrix" "0 -1 1 1 0 0 0 0 1"
Set the screen to always on
Some customers want to display without being affected by the screen saver function. You can use the following settings to turn off the screen saver function. Open lightdm.conf
Modify lightdm.conf Find "xserver-command" under the [SeatDefaults] section, uncomment it, and modify it to the following:
change into
-s # –Disable screen saver
dpms Turn off power saving management
Restart
Set the screen to turn off and on
Users can turn the screen on and off using the following commands.
Last updated
Was this helpful?