Waveshare SIM7600CE-CNSE 4G HAT for Raspberry Pi 4G 3G 2G GNSS
Product Link
Introduction
The SIM7600CE-CNSE 4G HAT is a hardware accessory designed for use with compatible development boards or microcontrollers. It is a communication module that provides 4G connectivity, allowing devices to access the internet and cellular networks. The "HAT" in its name stands for "Hardware Attached on Top," which indicates that it is designed to be easily attached to the top of a development board, such as a Raspberry Pi, providing additional functionality. The SIM7600CE-CNSE specifically refers to the model of the 4G module, which is manufactured by SIMCom, a company that specializes in wireless communication modules. This particular module supports various cellular network standards and can be used for a wide range of applications, including IoT devices, remote monitoring systems, and more.

Features
40PIN GPIO extension header for connecting Jetson Nano.
Supports dial-up, telephone calls, SMS, mail, TCP, UDP, DTMF, HTTP, FTP, etc.
Supports GPS, BeiDou, Glonass, and LBS base station positioning.
Onboard USB interface, to test AT Commands, get GPS positioning data, and so on.
Breakout UART control pins, to connect with host boards like Arduino/STM32.
Onboard CP2102 USB to UART converter, for serial debugging.
SIM card slot, supports 1.8V/3V SIM card.
Onboard TF card slot, which can be used to store files, text messages, and other data.
Onboard audio jack and audio decoder chip, for making telephone calls.
2 x LED indicators, easy to monitor the working status.
Onboard voltage translator, the operating voltage can be configured to 3.3V or 5V via jumper.
Baudrate: 300bps ~ 4Mbps (default: 115200bps)
Autobauding baudrate: 9600bps ~ 115200bps.
Comes with online resources and manuals (example demos such as Raspberry/Jetson Nano/Arduino/STM32).
Specifications

Pinout


Dimensions

How to Use
RPi Demo
Hardware Connection
pin connection diagram with Raspberry Pi

SIM7600X 4G HAT has onboard Raspberry Pi GPIO interface, which can be directly inserted into various versions of Raspberry Pi; the following table shows the connection between Raspberry Pi pins and module pins (Raspberry Pi 3rd Generation B+):
5V
5V
GND
GND
RXD
TXD (corresponding to 14 of BCM)
TXD
RXD (corresponding to 15 of BCM)
PWR
P22 (corresponding to P6 of BCM)
FLIGHTMODE
P7 (corresponding to P4 of BCM), enter flight mode when pulled high
* FLIGHTMODE is wired to pull up and will enter into flight mode.
Raspberry Pi initialization settings
To ensure that the SIM7600X 4G HAT can work normally after being connected to the Raspberry Pi, it is necessary to initialize the level output of some pins of the Raspberry Pi. The specific operations are as follows:
Download sample demo, after decompression, rename the c folder under the Raspberry folder to SIM7600X, Then copy the entire SIM7600X folder to the Raspberry Pi /home/pi directory.
The command line enters the /home/pi/SIM7600X directory and executes the command.
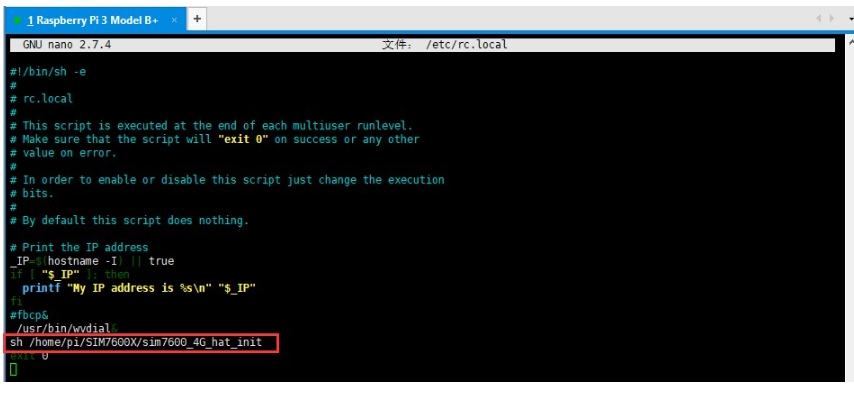
Set the boot initialization script, and run the command:
Add before exit 0 (as shown below):
Raspberry Pi serial port configuration
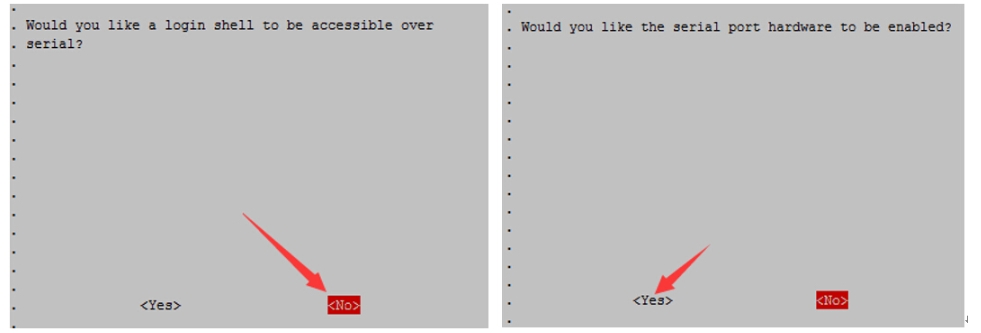
Since the Raspberry Pi serial port is used for terminal debugging by default, if you need to use the serial port, you need to modify the Raspberry Pi settings. Execute the following command to enter the Raspberry Pi configuration:
Select Interfacing Options -> Serial -> no -> yes to disable serial debugging. Open the /boot/config.txt file, and find the following configuration statement to enable the serial port, if not, add it at the end of the file:
Restart to take effect.
Raspberry Pi minicom serial port debugging
1. Insert the module into the Raspberry Pi. 2. Install minicom, which is a serial debugging tool for the Linux platform:
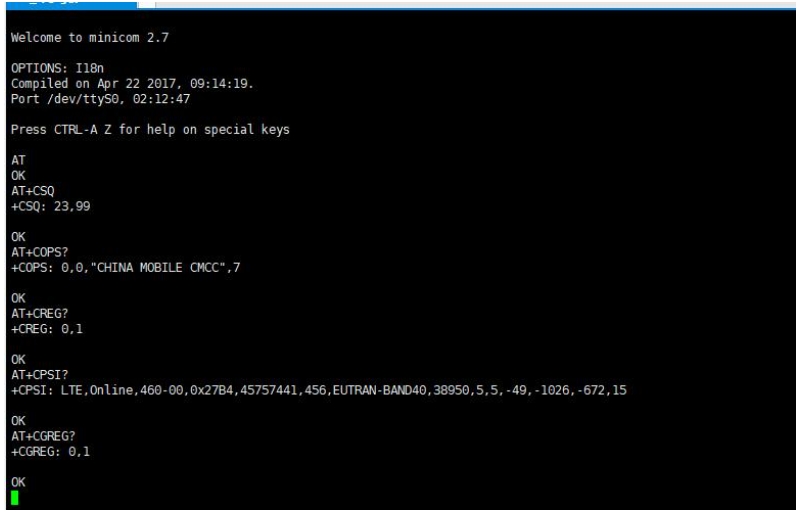
3. Execute minicom -D /dev/ttyS0 (ttyS0 is the serial port of Raspberry Pi 3B/3B+/4B). The default baud rate is 115200. Raspberry Pi 5/2B/zero, the user serial device number is ttyAMA0, and the Raspberry Pi 3B/3B+/4B serial device number is ttyS0. 4. Take the AT synchronization test as an example, and send relevant commands, as shown in the following figure: * minicom can enter setting mode by pressing Ctrl+A, then Z, and select X to exit. 5. Raspberry Pi 5 configures the ttyS0 serial port:
Edit config.txt file:
Add the following and the statement at the end.
You can see ttyS0 after restarting.
Sample Demo
1. Insert the module into the Raspberry Pi. 2. Download the sample demo to the /home/pi/ path:
3. Go to the bcm2835 directory, compile, and install it.
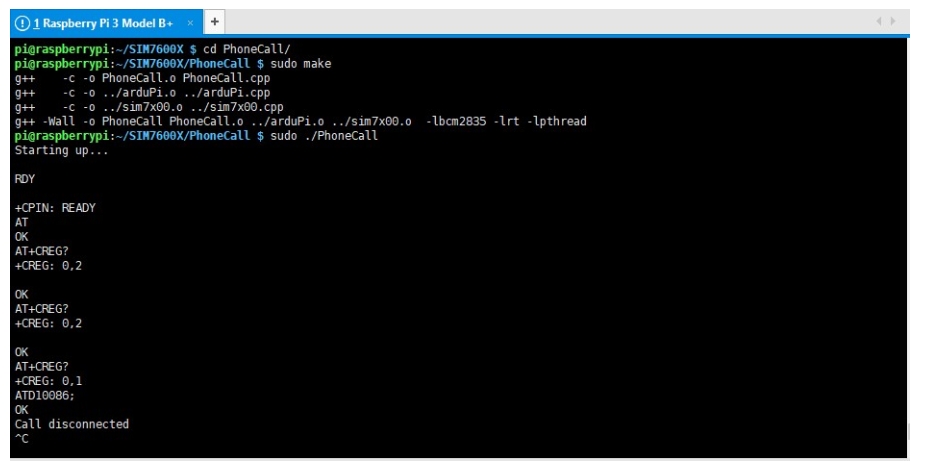
Note: If there is a problem with the compilation, please refer to the instructions in the FAQ. 4. Go to the corresponding instance directory, compile, and run the demo. The relevant instructions are as follows (take the PhoneCall demo as an example):
Use a combination of the above commands:
PHONECALL Call Demo
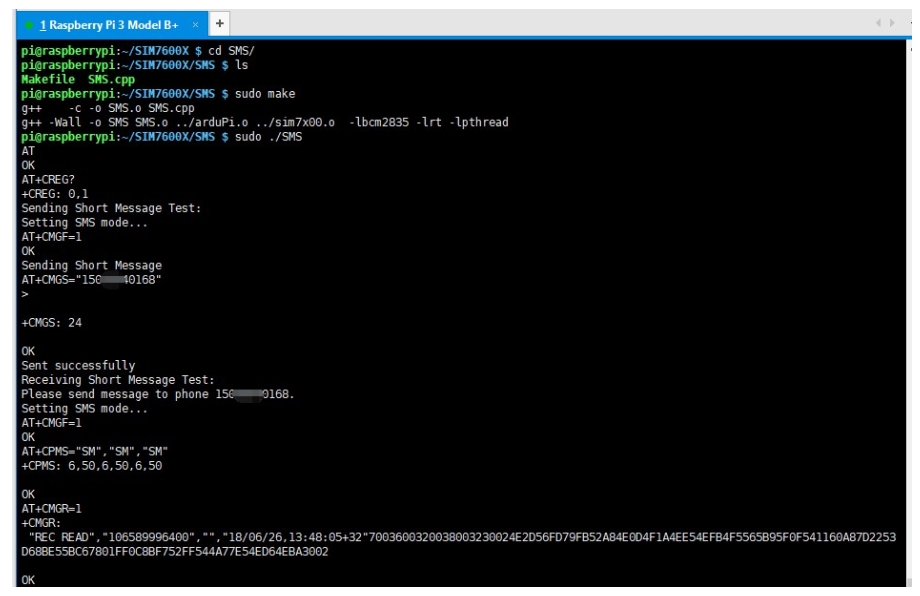
SMS Text Message Sending and Receiving Demo
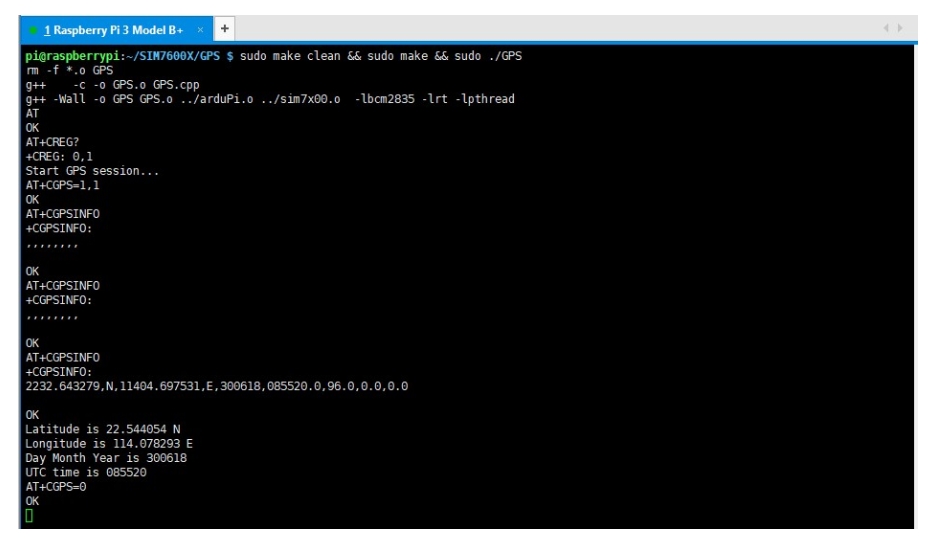
GPS Positioning Demo
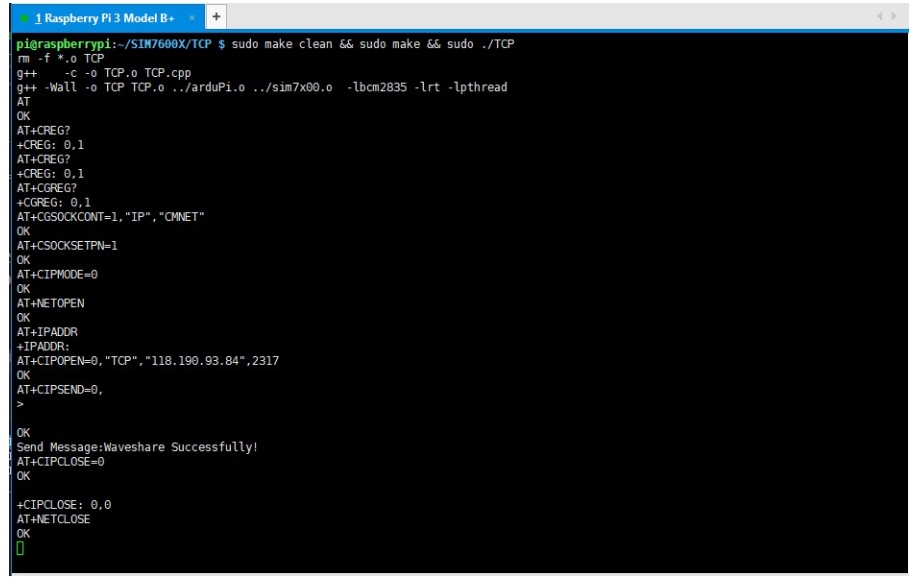
TCP Network Communication Demo
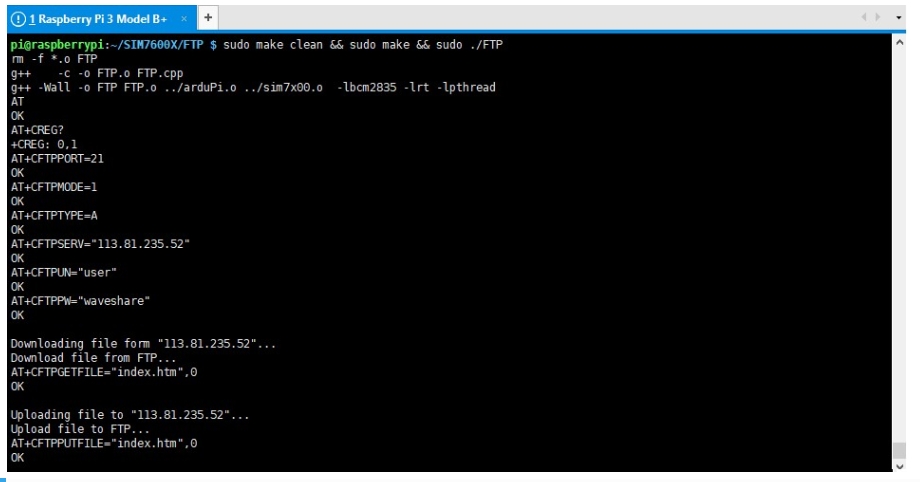
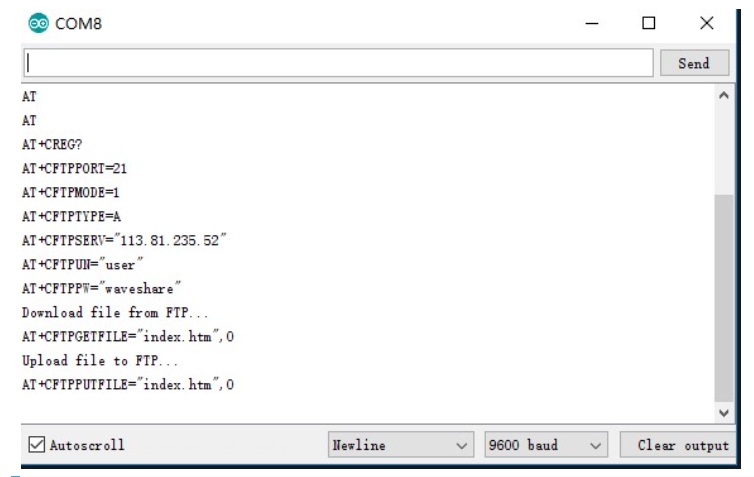
FTP Download and Upload Demos
Arduino Demo
Hardware Connection
Hardware connection to the development board UNO PLUS/Arduino UNO:
5V
5V
GND
GND
TXD
0 (RX)
RXD
1 (TX)
PWR
2
Install Arduino library
Download the decompression sample demo. Copy the Waveshare_SIM7600X_Arduino_Library folder to the Library directory under the Arduino IDE installation path. Open Arduino IDE --> File --> Examples --> Waveshare SIM7600X, and then choose to run the corresponding example demo:

Sample Demo
PHONECALL Call Demo
SMS Text Message Sending and Receiving Demo
GPS Positioning Demo
TCP Network Communication Demo
FTP Download and Upload Demo
Jetson Nano Demo
Hardware Connections
Connection diagram

Jetson Nano has an onboard RaspberryPi 40Pin GPIO interface, SIM7600X 4G HAT can be directly connected and used, and Jetson Nano's terminal access the serial port does not affect serial communication with SIM7600X 4G HAT (ie. Pin10 and Pin8).
5V
5V
GND
GND
TXD
10 (Board encoding)
RXD
8 (Board encoding)
PWR
31 (Board code)
Jetson Nano minicom serial port debugging

1. Connect the SIM7600X 4G HAT to the Jetson Nano, press the PWRKER button for three seconds, and then turn it on. 2. Use SERIAL to log in to the Jetson Nano terminal, install minicom, and enter:
3. Run minicom to debug the serial port, and enter in the terminal.
4. Send the AT command to test, press the PWRKEY button for three seconds to start the shutdown, exit the minicom and press Ctrl+A, then X, and finally press ENTER.
Python Demos

After installing the library:
Use the wget tool to download the source code to the specified folder of Jetson Nano, and copy the following command:
Enter the directory where the source code was just created and downloaded, and use the p7zip tool to unzip it to the current directory.
AT

SIM7600X_4G_HAT is connected to Jetson Nano, connected to the antenna, the demo uses the software to power on and off, there is no need to press the button to power on and off, and when you exit, press Ctrl+C to power off the software. Enter the Jetson Nano/AT directory and execute the command:
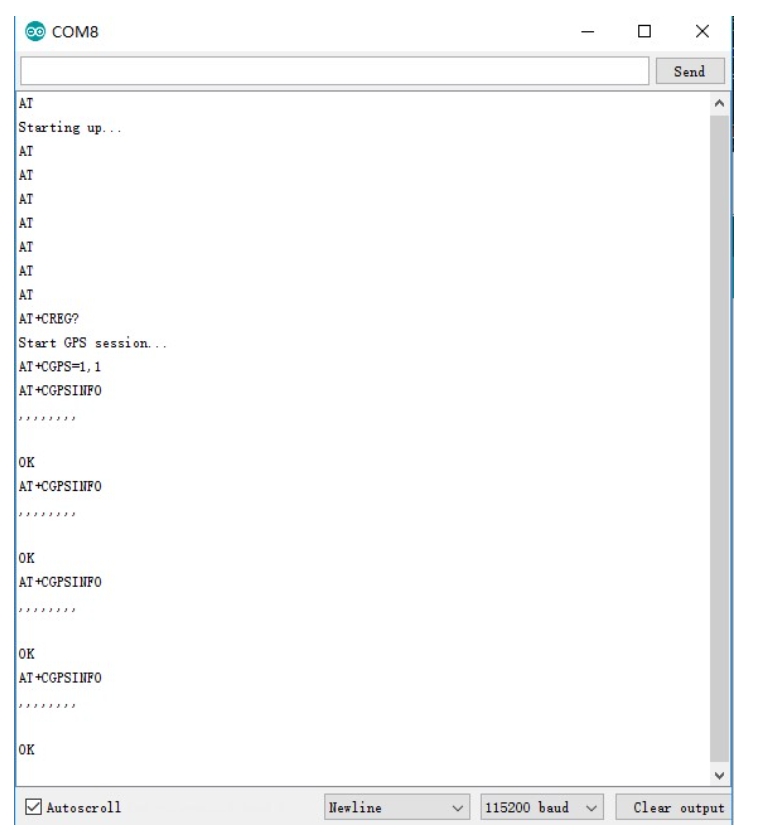
GPS

SIM7600X_4G_HAT is connected to the Jetson Nano and GNSS antenna. The routine uses software to power on and off. There is no need to press the button to power on and off. When exiting, press Ctrl+C to power off the software. Enter the Jetson Nano/GPS directory and execute the command:
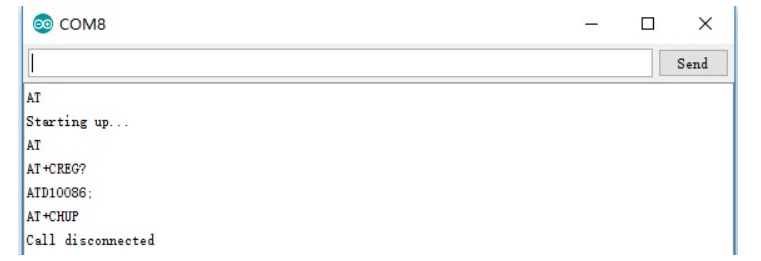
PhoneCall
SIM7600X_4G_HAT is connected to Jetson Nano, the main antenna, and the earphone. The demo uses software to power on and off, no need to press the button to switch on and off. This demo uses the mobile card to automatically dial 10086. Press Ctrl+C when exiting, and the software will start to Shut down. Enter the Jetson Nano/PhoneCall directory and execute the command:

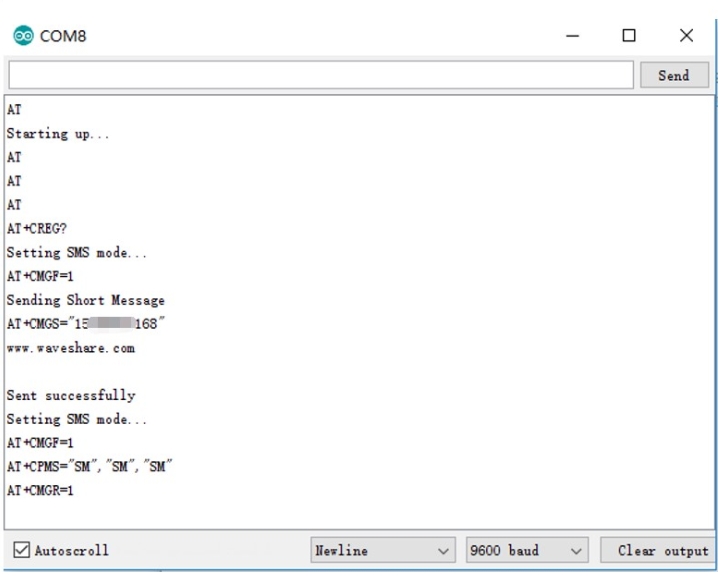
SMS

The SIM7600X_4G_HAT is connected to the Jetson Nano and the main antenna. The demo uses the software to turn it on and off, and there is no need to press the button to turn it on and off. This demo will automatically shut down the software after sending the information www.waveshare.com to the specified number. When users use SMS routines, they must first use tools such as vim to change the number in line 10 of the SMS.py file, replace * with a number, and keep the ' symbol. Enter the Jetson Nano/SMS directory and execute the command:
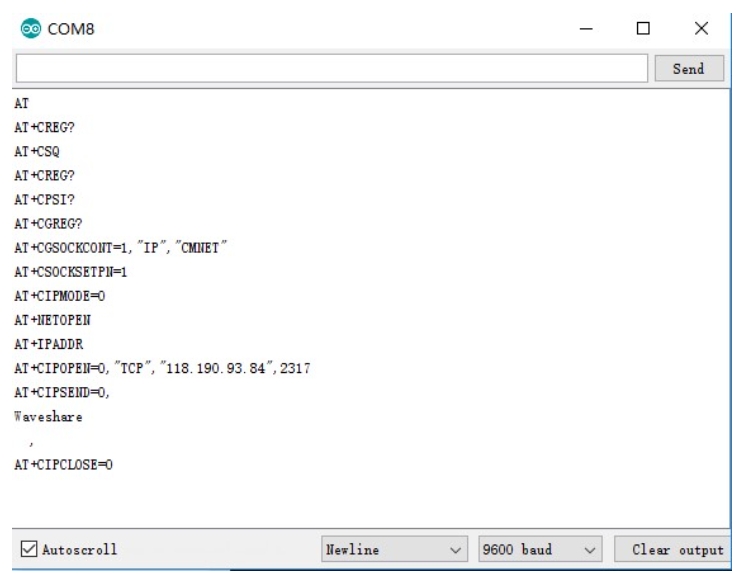
TCP
The SIM7600X_4G_HAT is connected to the Jetson Nano and the main antenna. The demo uses the software to turn it on and off, and there is no need to press the button to turn it on and off. Enter the Jetson Nano/TCP directory and execute the command:

More sample demos are continuously updated...
FAQ
When compiling the BCM2835 library, Makefile:327:recipe for target 'aclocal.m4' failed ?
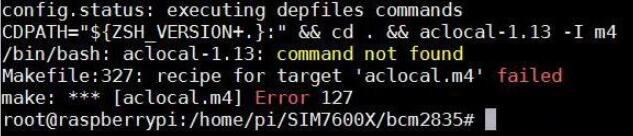

Execute autoreconf -vfi, and then recompile, see the figure below:

When executing the chmod 777 sim7600_4G_hat_init command, an error is reported: "chmod: cannot access 'sim7600_4G_hat_init': No such file or directory"How to deal with it?


Please confirm that there is a sim7600_4G_hat_init file in the current path
 The general operation is: download the sample program, after decompression, rename the c folder under the Raspberry folder to SIM7600X, and then copy the entire SIM7600X folder to the Raspberry Pi /home/pi directory, Enter the command line into the /home/pi/SIM7600X directory, and then execute the chmod 777 sim7600_4G_hat_init command.
SIM7600 firmware upgrade failed, the prompt is shown below, how to solve?
.png)
1. Pay attention to check the device manager, the upgrade process will prompt the new device inserted, and the first upgrade will not have a device driver; 2. Pay attention to the USB cable, the USB cable rate is high during the upgrade process, so you need to choose a better quality USB cable to avoid poor contact. 3. Need to run the upgrade tool with administrator privilege (SIM7500_SIM7600_QDL V1.41 only for Update). 4. Uninstall and reinstall the update tool (SIM7500_SIM7600_QDL V1.41 only for Update).
Use the WIN7 system, what should I do if the driver installation fails?
The new driver may not be compatible with some WIN7 systems, you can try the old driver:
1. Download the driver.
2. Connect the 4G HAT to a Windows computer as shown in the hardware connection diagram above (Windows 10 OS is used as an example below)
3. Make sure the module has been powered on properly: refer to the previous section "Switching on and off the module"
4. Open Device Manager->Other Devices->"SimTech, Incorporated "-> Update Driver -> Browse My Computer to find the driver file -> According to the system, select the path where the driver file is stored -> Installation is complete.
5. Install all the recognized devices and drivers:

How can I realize the module is recognized when using it in a Linux system?
The following command can be used to detect the presence of Qualcomm Qualcomm devices, and if a COM driver has been loaded (the Raspberry Pi system generally comes with it), a series of ttyUSB* will also appear:

How to debug SIM7600X via USB TO UART serial port?
Please put the jumper cap on C and connect the USB TO UART interface of SIM7600X to the USB port of a computer or Linux board such as Raspberry Pi through USB type to micro USB to send commands to debug:

What's the type of SIM card ?
Support SIM standard (Standard) card, as shown in the figure below, if it is a Micro or Nano card, you need to add a card sleeve.

Why is the positioning inaccurate and the coordinates obtained are different from those found online?
After turning on the GPS in the AT debug serial port, turn on the NMEA port to get the dynamic information.
 For more detailed steps, please refer to the following link.
SIM7600X gets the latitude and longitude in units, we commonly use degrees as the unit, please see below for more details.
For more detailed steps, please refer to the following link.
SIM7600X gets the latitude and longitude in units, we commonly use degrees as the unit, please see below for more details.
What should I do if I can't receive a GPS signal and don't get the location information?
Insert the GPS antenna into the GNSS antenna holder and place the receiver label side down in the open outdoors (note that the rainy weather test can not), the power needs to wait about 1 minute to receive the positioning signal;

What does the positioning information obtained by SIM7600X via AT+CGPSINFO represent respectively?
From left to right, they are (1) dimension, (2) longitude, (3) date, (4) time, (5) altitude, (6) speed, and (7) heading angle.
.png)
Why is my dial-up internet connection so slow?
Generally, the default configuration of SIM7600 is to automatically select the network standard, and it is likely to choose 2G Internet access; if you need to force the use of 4G mode, you need to enter the following AT command configuration:

If 4G has been fixed and the speed is still not ideal, it may be a frequency band problem;

Why does it return NO CARRIER after the computer NDIS dials?

Answer:
Under normal circumstances, SIM7600X has already dialed automatically when it is connected to the Windows system, no need to repeat the dialing, the repeated dialing will return NO CARRIER
If you still cannot dial up, please use the following command to change to the Windows default dial-up mode
The display is turned off and the mobile network is not enabled, you can ignore it and go online directly;

You can also install the driver SIM7600X dial-up Driver to update the network card

After installing the driver, the network card shows that it is enabled

Why can't I control the module with UART on Raspberry Pi, can't open ttyS0 through minicom, prompting any ttyS0?
Open the Raspberry Pi terminal and input the following commands:
 Raspberry Pi 2B/zero, the user serial device number is ttyAMA0; you can use the following command line to confirm that serial0 is the selected serial device number, as follows:
![]()
What is the difference between RNDIS, NDIS, PPP, and ECM dialing methods?
Differences as shown below:

Windows dial-up:
What should I do if the network is abnormal?
In this case, it may be that you have not successfully connected to the network, you can follow the steps below to troubleshoot: 1. First check the hardware connection:
Check if the MAIN antenna is connected properly;
Whether the connected SIM card can communicate and surf the Internet normally on mobile phones and other devices:
If the Raspberry Pi is connected, whether the module enters airplane mode;
2. After confirming that there is no problem with the hardware, the software can use these instructions:
Check if the sim card is in good contact: AT+CPIN?
Check if the network mode setting is correct: AT+CNMP?
Check the signal quality of the current environment: AT+CSQ
Check carrier access:AT+COPS?
Check internet connection:AT+CPSI?
Check for successful registration to the network: AT+CGREG?

Last updated
Was this helpful?