Seeed Studio Wi-Fi HaLow Board based on the FGH100M-H module
Product Link
Description
This tutorial will guide you through setting up and using the Wio-WM6180 Wi-Fi HaLow Module with a XIAO ESP32S3 to build a Wi-Fi HaLow client. Wi-Fi HaLow (IEEE 802.11ah) is designed for long-range, low-power IoT applications, operating in the sub-1 GHz frequency band. We'll walk through the hardware setup, software configuration, and demonstrate how to establish Wi-Fi HaLow connectivity for your IoT projects.
Key Features
Long range Wi-Fi connectivity up to 1km line-of-sight
Low power consumption ideal for IoT devices
Sub-1 GHz operation for better penetration through walls and obstacles
Compatible with XIAO ESP32S3 development board
Easy to follow setup and configuration process
Hardware
The following table outlines the key specifications of the Wio-WM6180 Wi-Fi HaLow Module:
Operating Voltage
3.3
V
Operating Current
TBD
mA
Wi-Fi Protocol
IEEE 802.11ah
-
Frequency Band
Sub-1 GHz
-
Range
Up to 1
km
Interface
SPI
-
Dimensions
TBD
mm
What is Wi-Fi HaLow?
Wi-Fi HaLow is a wireless networking protocol based on the IEEE 802.11ah standard, specifically designed for Internet of Things (IoT) applications. Operating in the sub-1 GHz frequency band (typically 900 MHz), Wi-Fi HaLow offers several significant advantages over traditional Wi-Fi:
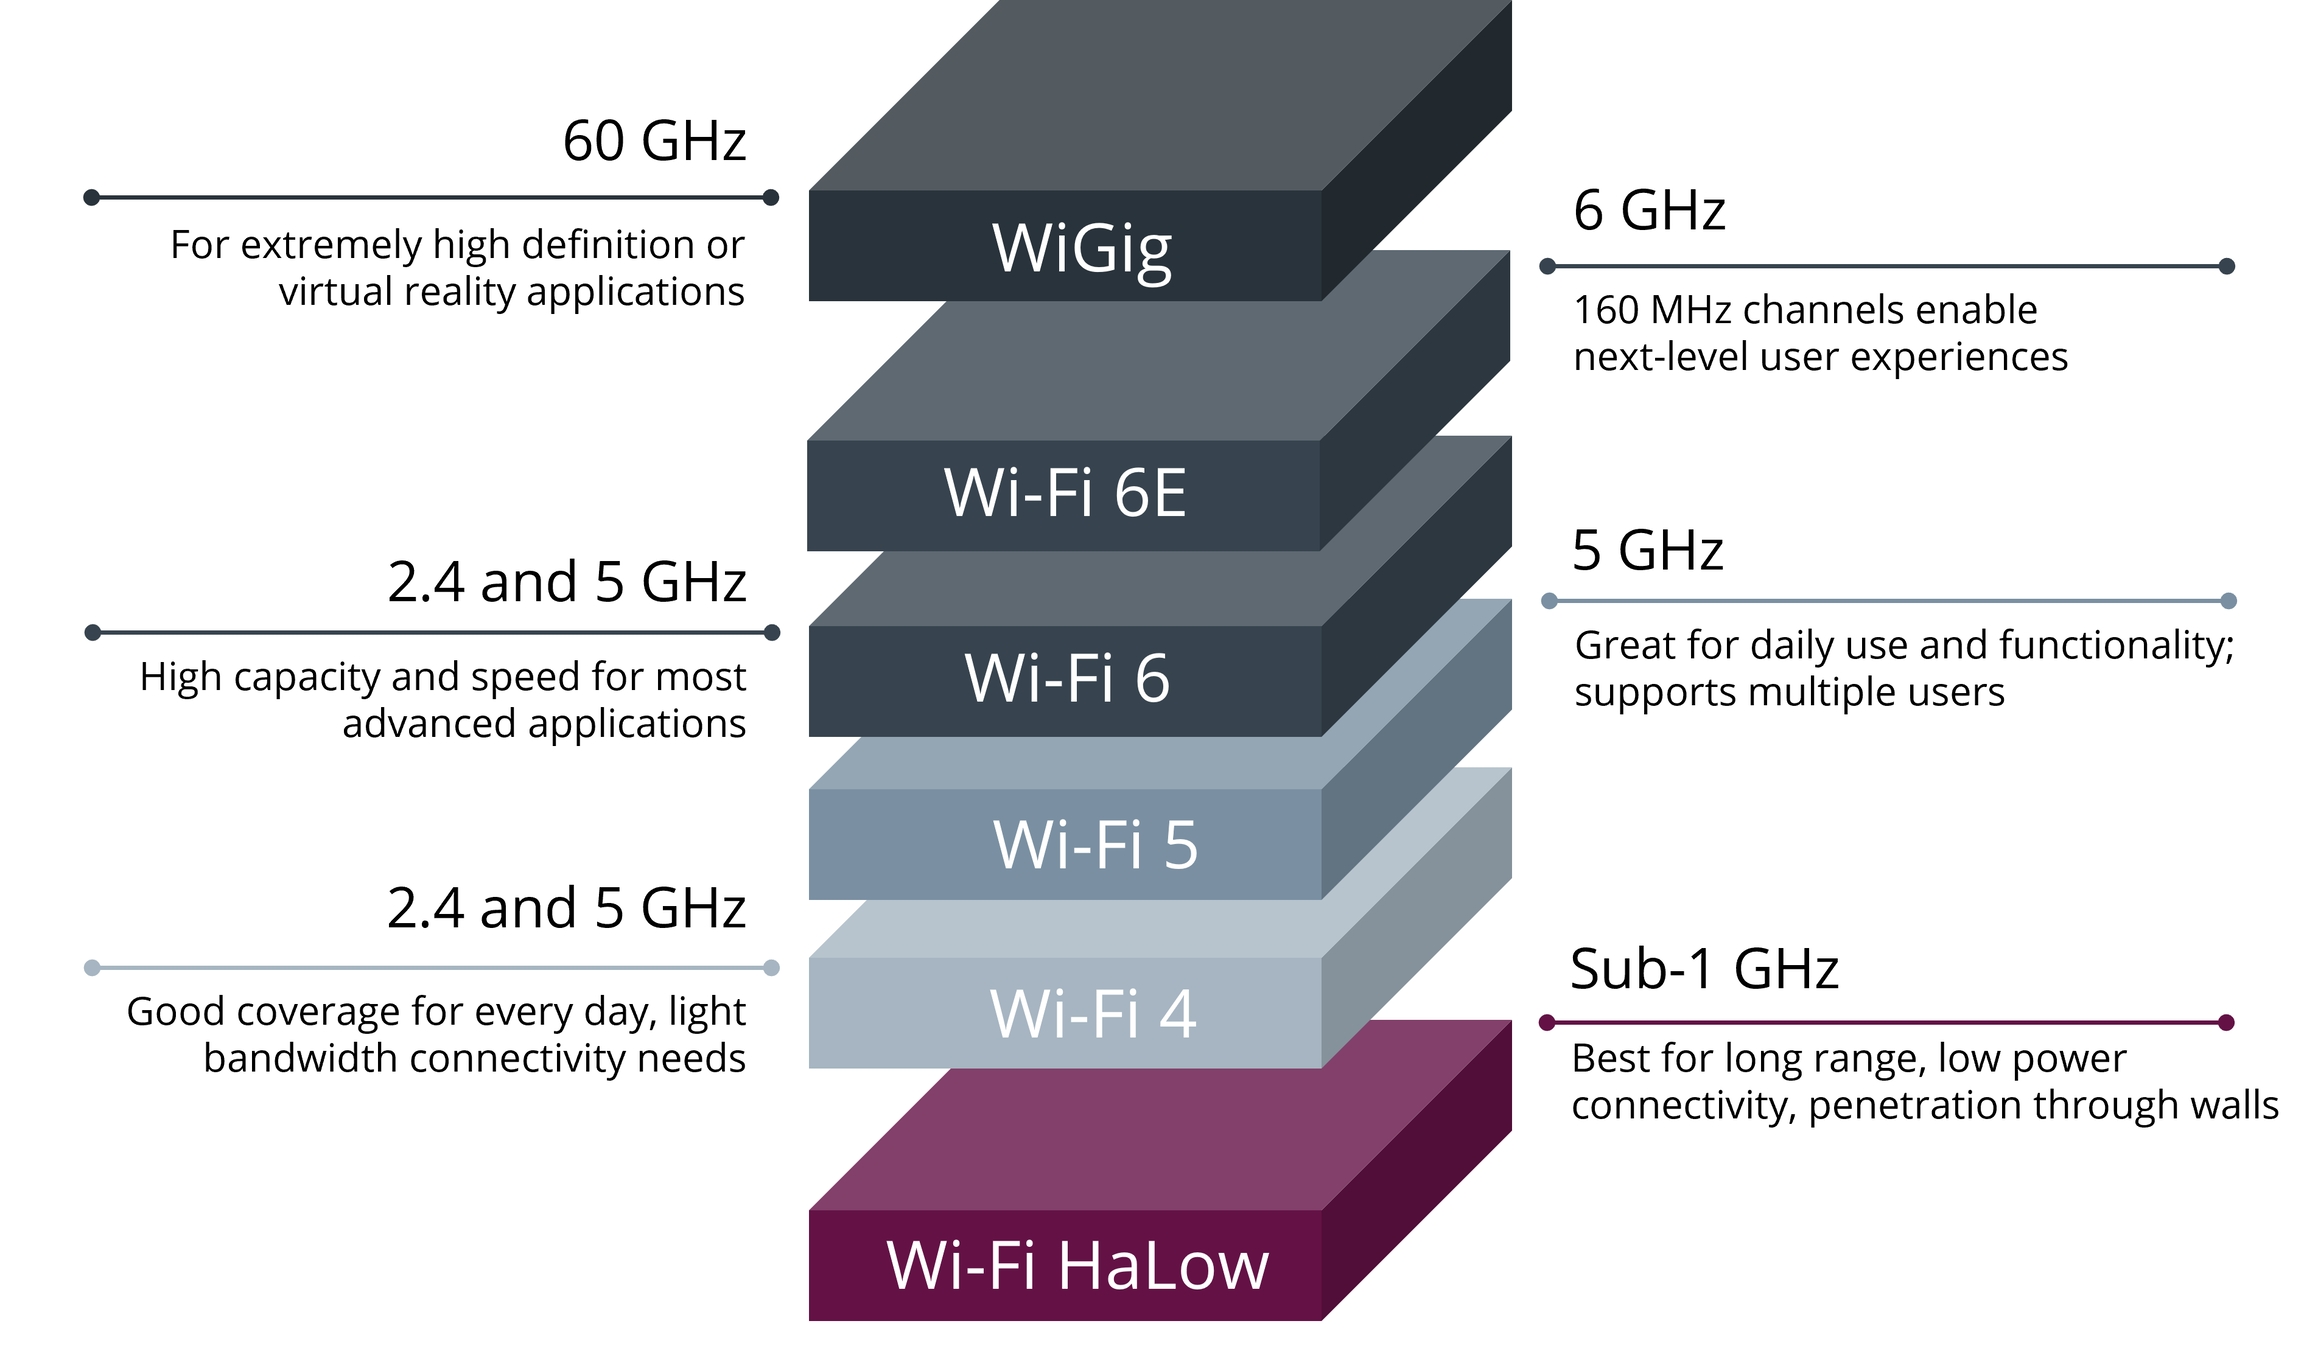
Extended Range: Wi-Fi HaLow can achieve distances up to 1 kilometer in line-of-sight conditions, far exceeding the range of conventional Wi-Fi.
Improved Penetration: The lower frequency signals can better penetrate through walls and other obstacles, making it ideal for challenging environments.
Low Power Consumption: Designed with IoT devices in mind, Wi-Fi HaLow enables years of battery life for connected devices.
Scalability: Supports thousands of devices connected to a single access point, perfect for large-scale IoT deployments.
Security: Inherits the robust security features of the Wi-Fi family, including WPA3 encryption.
Why Wi-Fi HaLow Matters
Wi-Fi HaLow addresses the growing needs of IoT applications that require long-range connectivity, low power consumption, and the ability to handle numerous devices simultaneously. It bridges the gap between traditional Wi-Fi and LPWAN technologies, offering:
Industrial IoT: Enables reliable connectivity in factories, warehouses, and industrial settings.
Smart Agriculture: Provides coverage across large agricultural areas for sensor networks.
Smart Cities: Supports extensive networks of connected devices in urban environments.
Asset Tracking: Allows for long-range tracking of valuable assets and equipment.
By combining the familiarity of Wi-Fi with the benefits of low-power, long-range connectivity, Wi-Fi HaLow is poised to play a crucial role in the expansion of IoT applications across various industries.
Wi-Fi HaLow System Architecture
A typical Wi-Fi HaLow network consists of several key components that work together to enable long-range, low-power IoT connectivity:
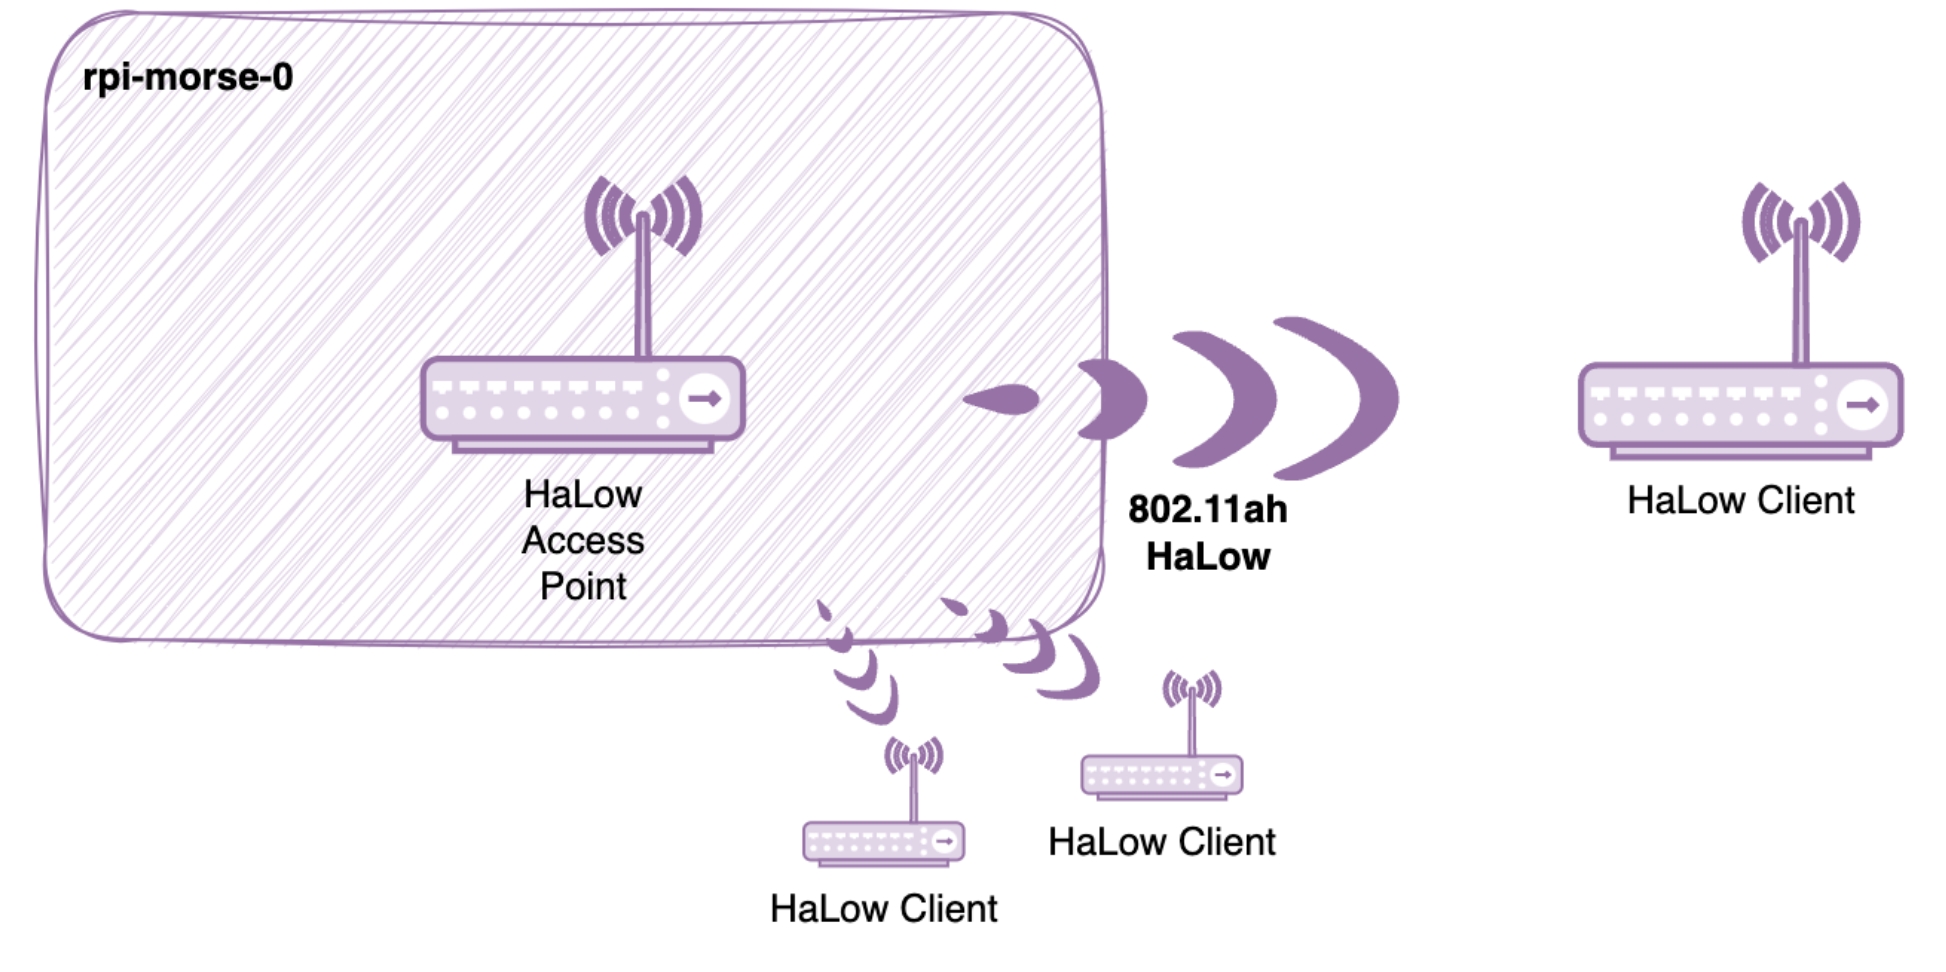
Access Point (AP): The central hub of the Wi-Fi HaLow network, responsible for managing connections and routing data between devices and the internet.
Stations (STA): The client devices that connect to the Access Point. These can be sensors, actuators, or other IoT devices.
Gateway: Acts as a bridge between the Wi-Fi HaLow network and other networks (e.g., Ethernet or cellular).
MM-IoT-SDK Framework
The WM6180 module utilizes MorseMicro's MM-IoT-SDK, which provides:
Multi-protocol Support: Enables seamless integration with various IoT protocols
Low Power Management: Optimized power consumption for battery-powered devices
Security Features: Built-in encryption and authentication mechanisms
Easy Configuration: Simplified API for network setup and management
The MM-IoT-SDK architecture consists of several layers:
Hardware Abstraction Layer (HAL): Provides a unified interface for different hardware platforms
Network Stack: Implements the Wi-Fi HaLow protocol stack
Application Layer: Offers APIs for application development and device management
This framework allows developers to quickly implement Wi-Fi HaLow functionality while maintaining flexibility for custom applications.
Building Example Firmware
The mm-iot-esp32 repository includes several example applications that demonstrate different functionalities. Here's how to build and configure these examples:
Example Applications Location
All example applications can be found in the examples directory of the repository. Available examples include:
scan: Wi-Fi scanning exampleiperf: iperf server examplesta_reboot: Wi-Fi station reboot examplesta_connect: Wi-Fi station connection exampleweb_camera_server: Web camera server exampleAnd more...
Configure Network Credentials
Before building the firmware, you need to configure the network settings in the example's configuration file:
Navigate to your chosen example directory:
Edit the configuration file:
In this file, you can modify:
Country code (should be set to US as the product is currently only available for North America)
Wi-Fi HaLow network credentials
Other network-related parameters
caution:
Important Note About Country Code:
The country code must be set to "US" as this product is currently only available for the North American market
The product is not yet available for other regions due to regulatory requirements
Using the product in regions other than North America may violate local regulations
Building Process
After configuring the network settings, you can build the firmware using these commands:
note:
The
idf.py set-targetcommand only needs to be run once for each exampleidf.py fullcleanensures a clean build by removing all previous build artifactsAfter successful build, the firmware binary will be located in the
builddirectory
Build Output
After a successful build, you should see output similar to this:
Below, we will demonstrate a few examples.
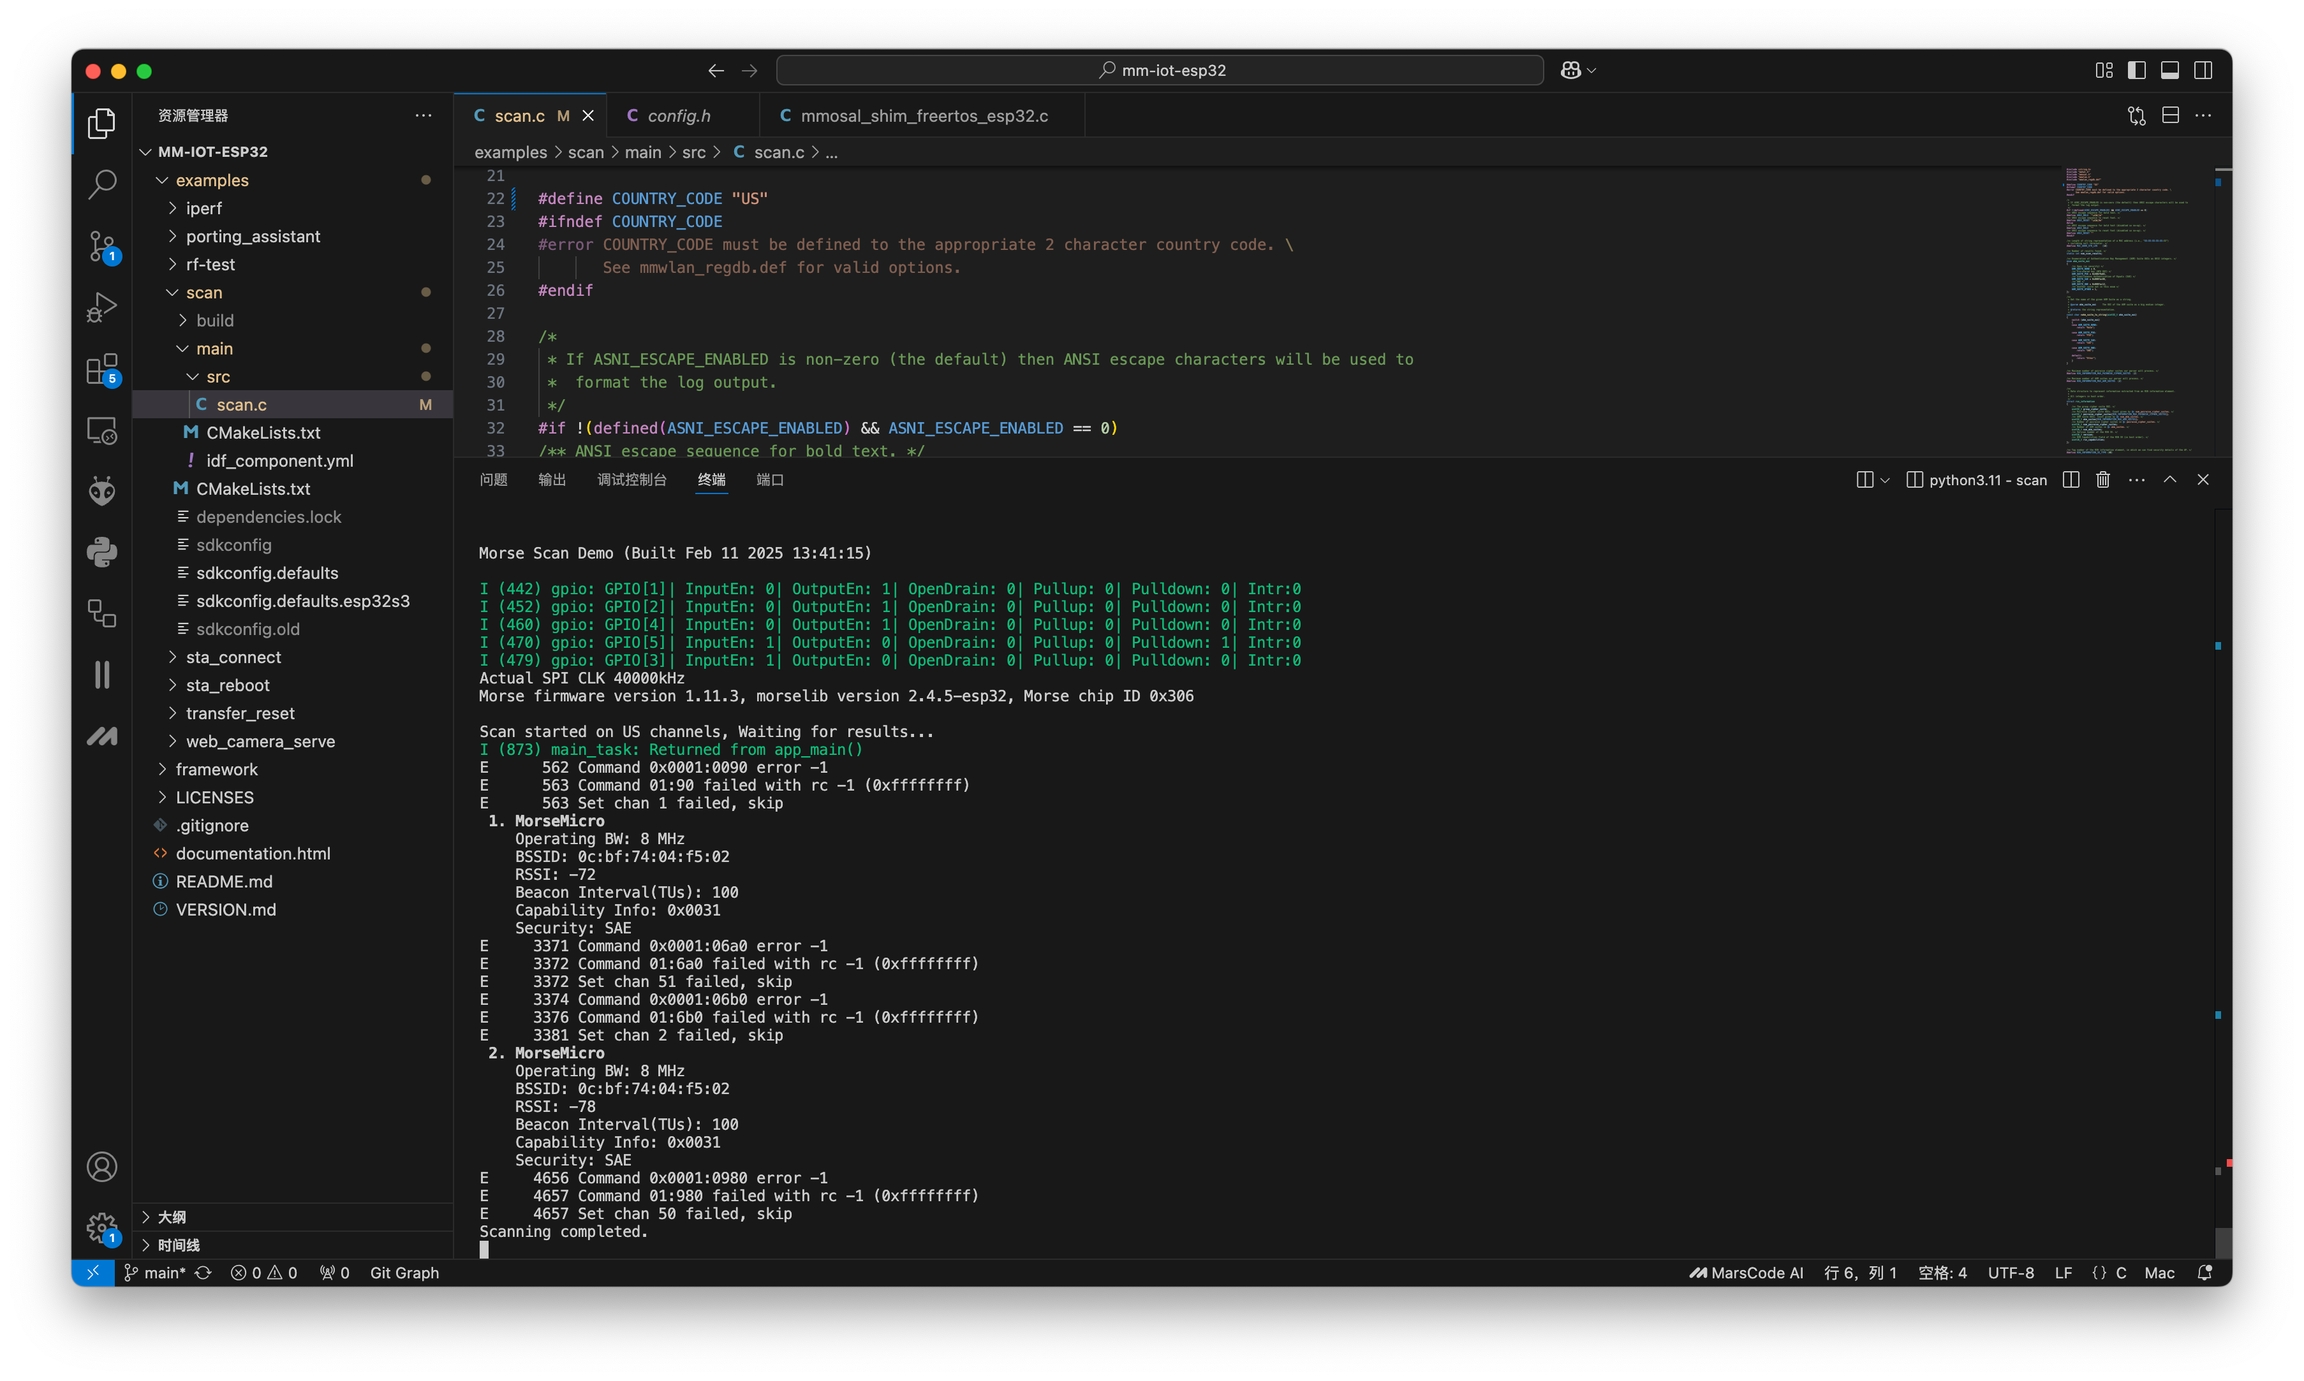
Example 1. scan
This example demonstrates how to scan for available Wi-Fi HaLow networks in your vicinity. Follow these steps to build and run the scan example:
Step 1: Navigate to the Scan Example
Step 2: Configure Country Code
Open the configuration file:
Locate and modify the country code line:
Step 3: Hardware Setup
Connect the Wio-WM6180 Wi-Fi HaLow Module to your XIAO ESP32S3
Connect the XIAO ESP32S3 to your computer via USB
Step 4: Build and Flash
Execute the following commands in sequence:
Step 5: Monitor Results
If everything is working correctly:
The serial monitor will start automatically after flashing
The program will begin scanning for Wi-Fi HaLow networks
If any Wi-Fi HaLow gateways are in range, their information will be displayed in the serial monitor
Example output in the serial monitor:
tip:
Make sure there are Wi-Fi HaLow gateways in your vicinity to detect networks
The scanning process runs continuously, so you'll see periodic updates of available networks
Press Ctrl+C to stop the monitor and exit the program
note:
If you don't see any networks:
Verify that your Wi-Fi HaLow gateway is powered on and functioning
Check that you're within range of the gateway
Ensure the module is properly connected to your XIAO ESP32S3
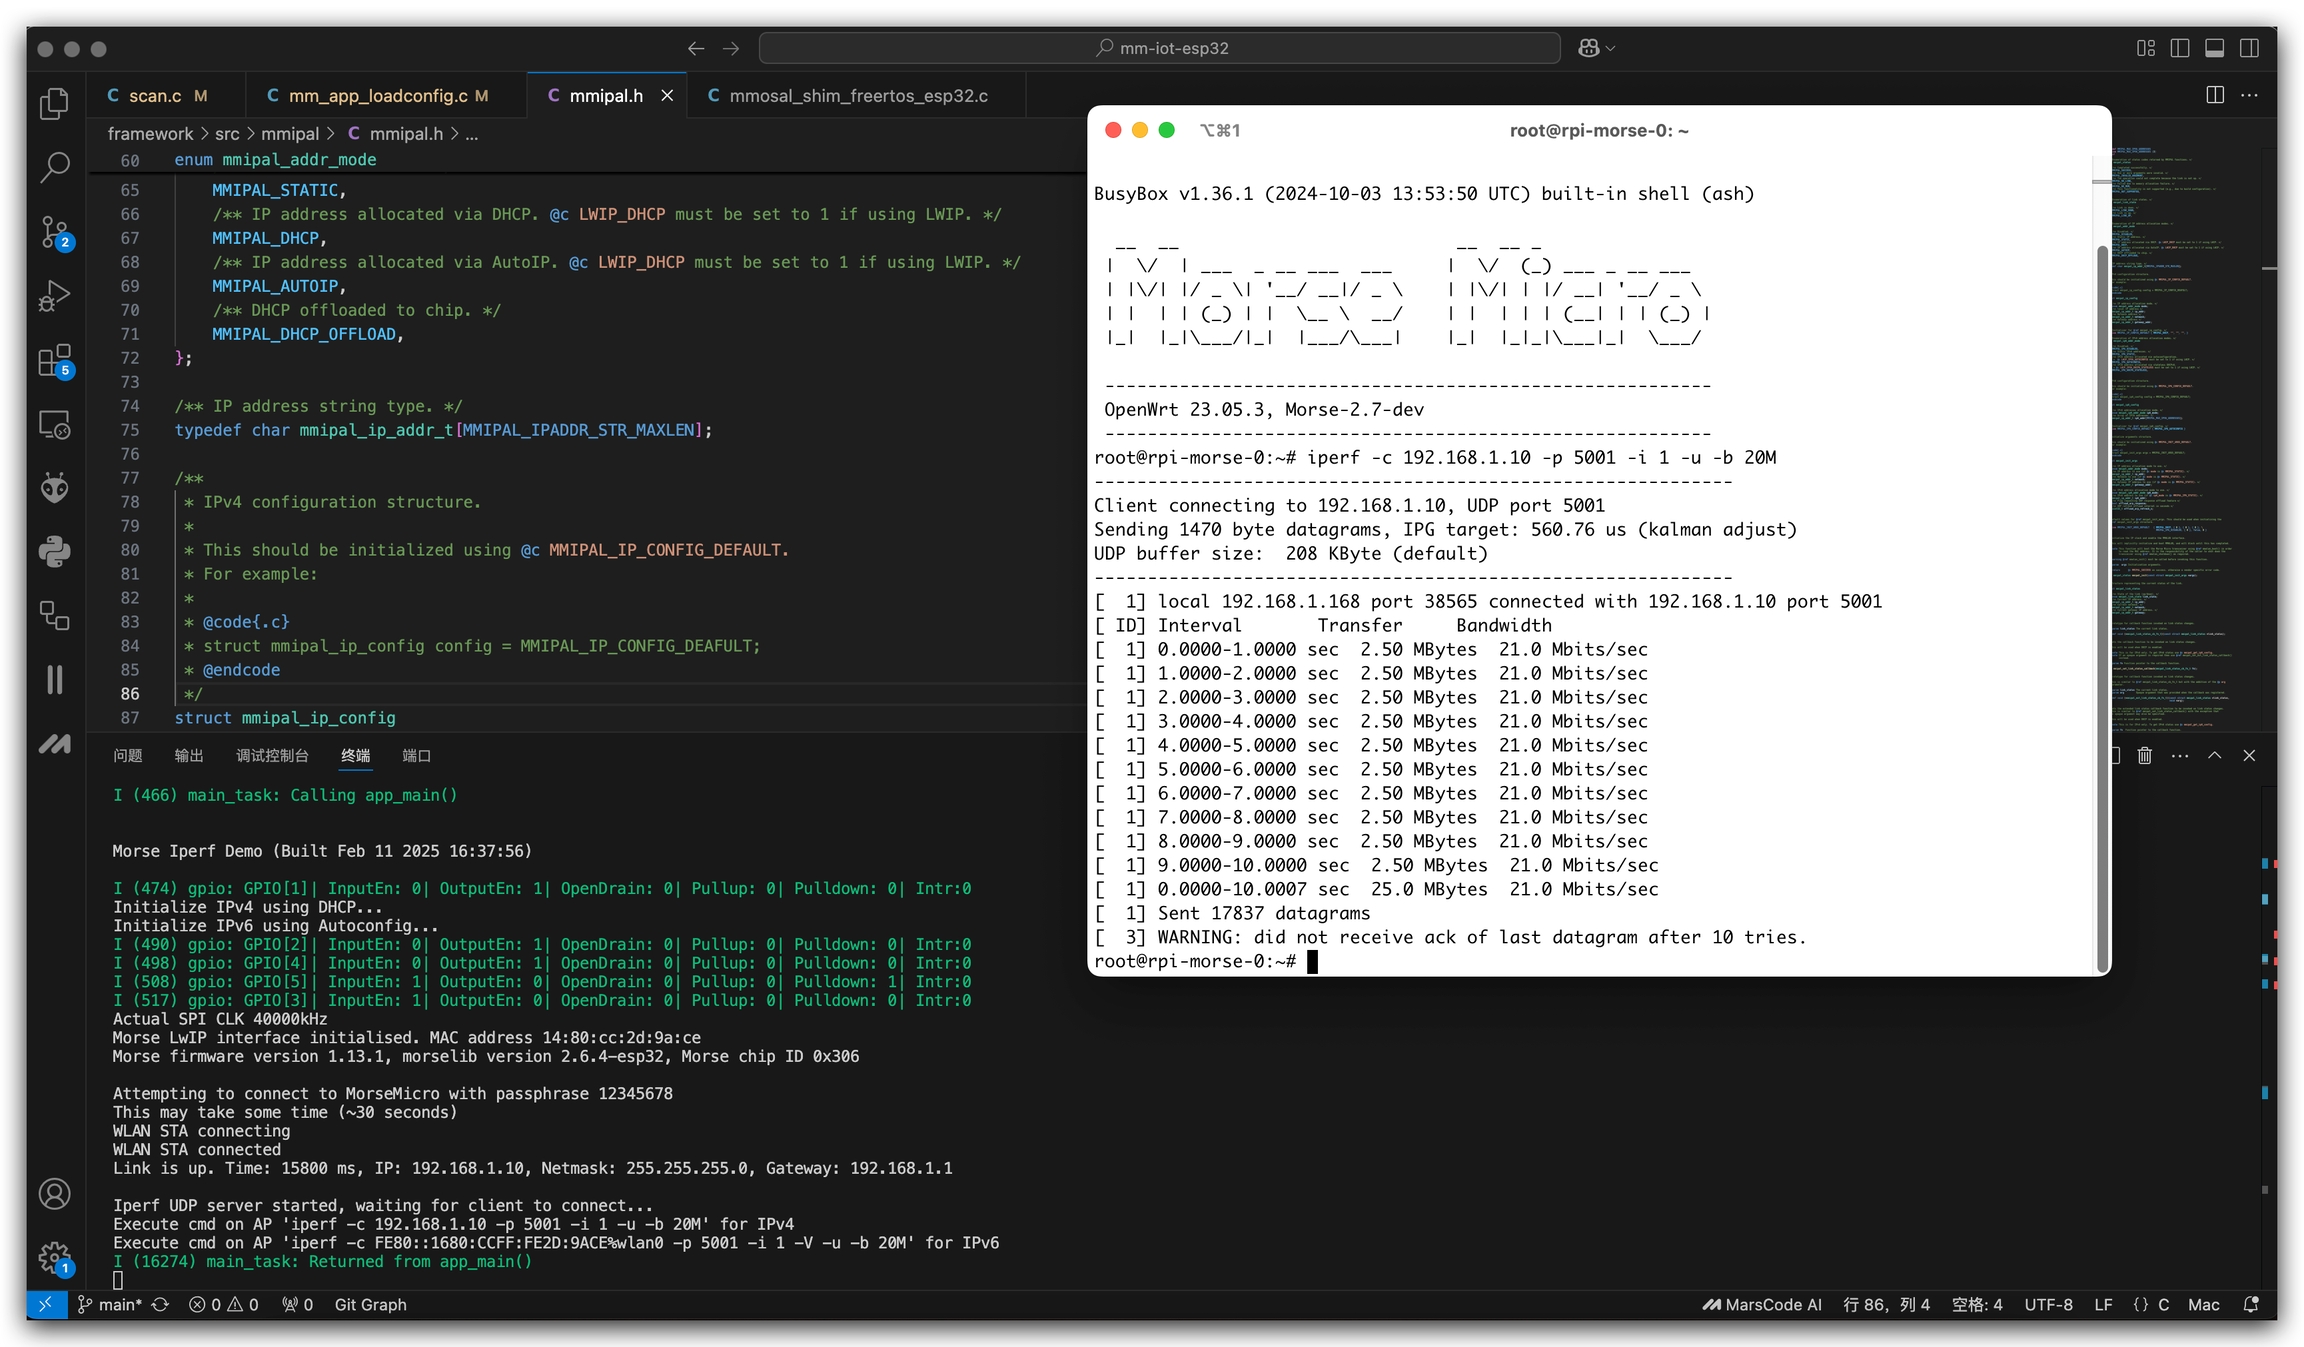
Example 2. iperf
This example demonstrates how to test the network performance of your Wi-Fi HaLow connection using iPerf. Follow these steps to build and run the iPerf example:
Step 1: Navigate to the iPerf Example
Step 2: Configure Network Settings
Open the configuration file:
Modify the following parameters:
Step 3: Hardware Setup
Connect the Wio-WM6180 Wi-Fi HaLow Module to your XIAO ESP32S3
Connect the XIAO ESP32S3 to your computer via USB
Step 4: Build and Flash
Execute the following commands in sequence:
Step 5: Run Performance Test
Once the program is running successfully, you'll see the iPerf service start up. Now you can run performance tests from your Wi-Fi HaLow gateway.
For IPv4 testing, execute this command on your gateway:
For IPv6 testing, execute this command on your gateway:
The parameters explained:
-c: Run in client mode-p: Port number-i: Report interval (1 second)-u: Use UDP protocol-b: Target bandwidth (20 Mbps)-V: IPv6 mode (for IPv6 testing only)
tip:
Make sure your device has successfully connected to the Wi-Fi HaLow network before running the performance test
The device's IP address will be displayed in the serial monitor after connection
You can adjust the bandwidth (-b parameter) based on your testing needs
note:
Common issues and solutions:
If connection fails, verify your network credentials
If iPerf service doesn't start, check your hardware connections
If performance is poor, ensure you're within good range of the gateway
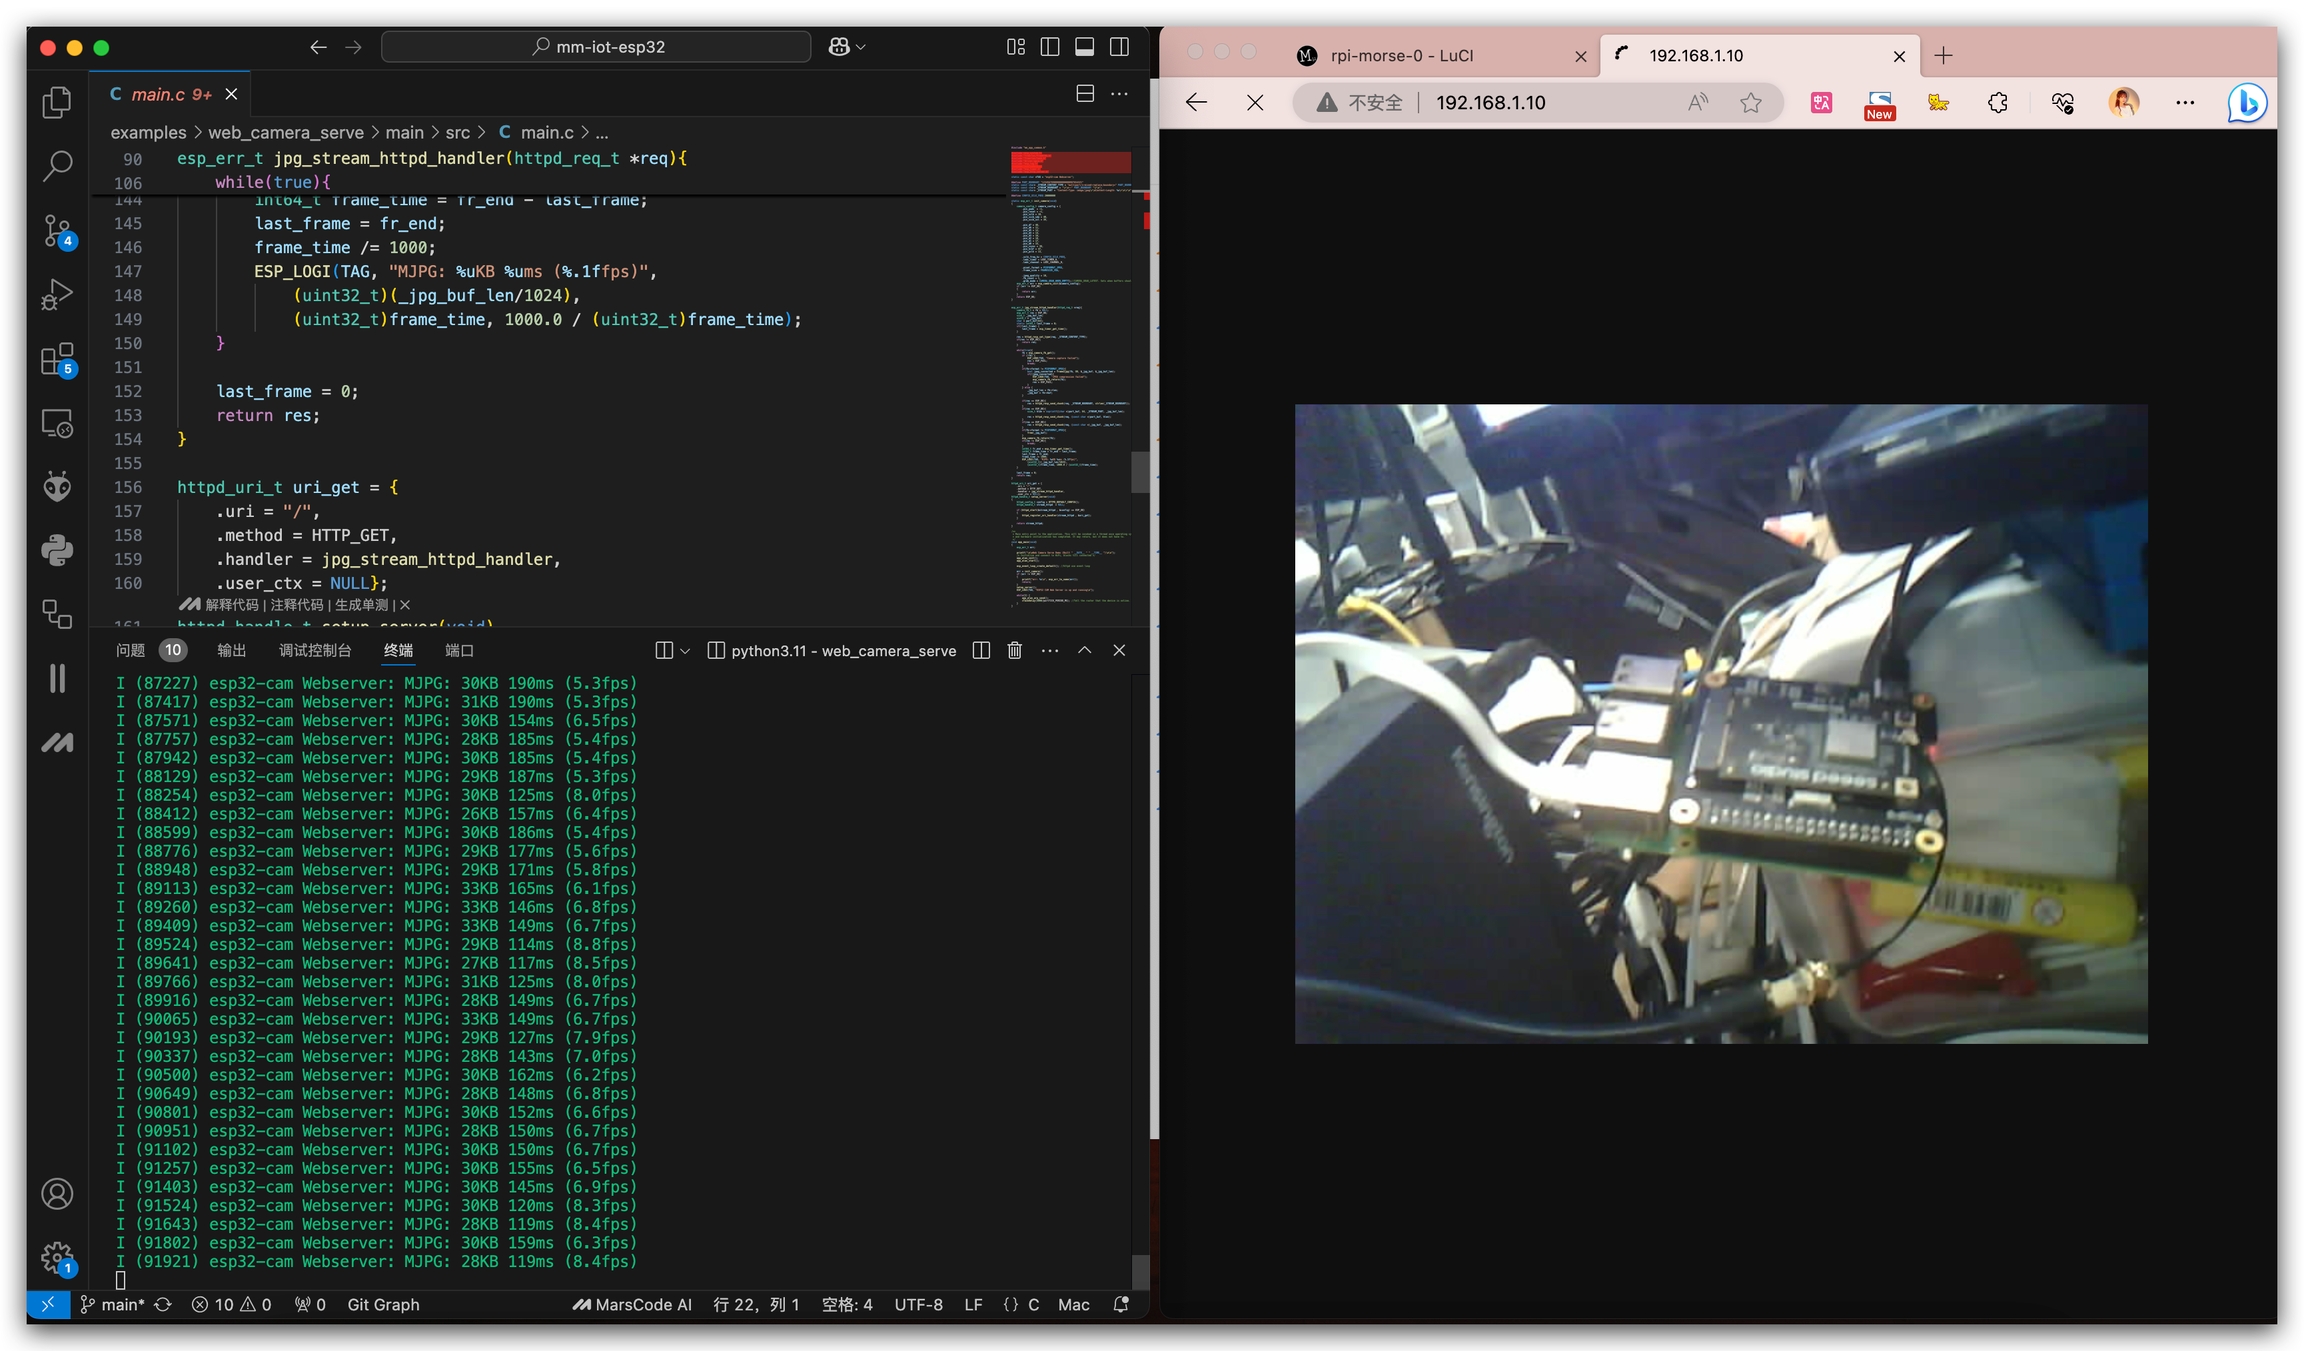
Example 3. web_camera_server
This example demonstrates how to stream camera feed from XIAO ESP32S3 Sense over Wi-Fi HaLow network. Follow these steps to build and run the web camera server:
Step 1: Navigate to the Web Camera Example
Step 2: Configure Network Settings
Open the configuration file:
Modify the Wi-Fi HaLow credentials:
Step 3: Hardware Setup
Connect the Wio-WM6180 Wi-Fi HaLow Module to your XIAO ESP32S3 Sense
Ensure the camera module on your XIAO ESP32S3 Sense is properly connected
Connect the XIAO ESP32S3 Sense to your computer via USB
Step 4: Build and Flash
Execute the following commands in sequence:
Step 5: Access the Camera Feed
Once the program is running successfully:
Note the IP address displayed in the serial monitor
Open a web browser on any device connected to the same network as your Wi-Fi HaLow gateway
Enter the IP address in your browser's address bar
You should now see the live camera feed from your XIAO ESP32S3 Sense
Example URL:
tip:
For the best streaming experience:
Ensure good lighting conditions for better image quality
Keep the XIAO ESP32S3 Sense within good range of the Wi-Fi HaLow gateway
Use a modern web browser for optimal compatibility
note:
Troubleshooting:
If you can't access the camera feed, verify that your device is on the same network as the Wi-Fi HaLow gateway
If the image is not showing, check that the camera module is properly connected
If the stream is laggy, try moving closer to the Wi-Fi HaLow gateway
Resources
[GITHUB] mm-iot-esp32 repository
[GITHUB] mm-iot Document
Last updated
Was this helpful?