M5StickC PLUS ESP32-PICO Mini IoT Development Kit
Product Link
Introduction
M5StickC PLUS is an upgraded version of the original M5StickC, featuring ESP32-PICO-D4 with Wi-Fi connectivity and a larger screen. This compact and portable IoT development board is designed to be user-friendly and open source, allowing you to easily bring your ideas to life and accelerate your IoT prototyping process. With M5StickC PLUS, you can enjoy a streamlined development experience, reducing the complexities often associated with building IoT projects.

As one of the core devices in the M5Stack product series, M5StickC PLUS offers a rich set of hardware resources integrated into its compact body. These resources include infrared, RTC, microphone, LED, IMU, buttons, and PMU. Notably, this upgraded version introduces new features such as a buzzer, a larger 1.14-inch LCD screen with a resolution of 135 * 240, and a more stable hardware design. The increased display area by 18.7% and the enhanced battery capacity from 95mAh to 120mAh further enhance the usability and performance of the device.
M5StickC PLUS is designed to support the HAT and Unit family of products, expanding its capabilities and providing compatibility with various accessories and modules. This allows you to easily extend the functionality of your projects and explore a wide range of possibilities. With its improved features and expanded compatibility, M5StickC PLUS is an excellent choice for IoT development, enabling you to create innovative solutions with ease.
Features
ESP32-based support Wi-Fi
Built-in 6-Axis IMU
Red LED
IR transmitter
Microphone
RTC
Buttons, LCD(1.14 inch)
Built-in Lithium Polymer Battery
Extendable Socket
Built-in Passive Buzzer
Wearable & Wall mounted
Specification
ESP32
240MHz dual core, 600 DMIPS, 520KB SRAM, Wi-Fi
Flash Memory
4MB
Power Input
5V @ 500mA
Port
TypeC x 1, GROVE(I2C+I/0+UART) x 1
LCD screen
1.14 inch, 135*240 Colorful TFT LCD, ST7789v2
Button
Custom button x 2
LED
RED LED
MEMS
MPU6886
Buzzer
built-in buzzer
IR
Infrared transmission
MIC
SPM1423
RTC
BM8563
PMU
AXP192
Battery
120 mAh @ 3.7V
Antenna
2.4G 3D Antenna
PIN port
G0, G25/G36, G26, G32, G33
Operating Temperature
0°C to 60°C
Net weight
15g
Gross weight
21g
Product Size
48*24*13.5mm
Package Size
114*64*22mm
Case Material
Plastic ( PC )
Pinout
RED LED
LED Pin
IR Transmitter
Transmitter Pin
BUTTON A
Button Pin
BUTTON B
Button Pin
Buzzer
Buzzer Pin
Dimensions

How to Use
1. Preparation
Arduino IDE Installation: Refer to the Arduino IDE Installation Guide to complete the IDE installation.
Board Manager Installation: Refer to the Basic Environment Setup Guide to complete the IDE and M5Stack board manager installation, and select the
M5StickC Plusdevelopment board.Dependency Library Installation: Refer to the Library Management Installation Guide to complete the installation of the
M5StickC Plusdriver library.
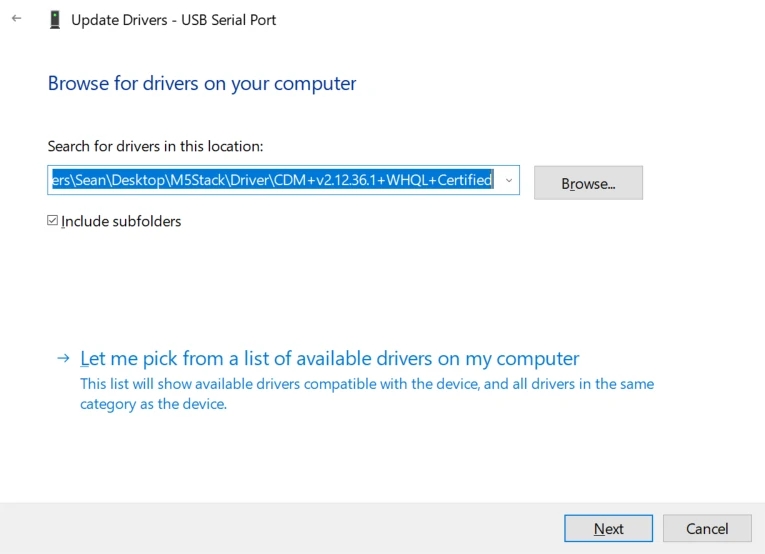
2. USB Driver Installation
Connect the device to the PC and open Device Manager to install the FTDI driver . For Windows 10, download the driver file matching your operating system, decompress it, and install it through Device Manager. (Note: In some system environments, the driver needs to be installed twice to take effect. Unrecognized device names are usually M5Stack or USB Serial. For Windows, it is recommended to use Device Manager to install the driver file directly (custom update), as the executable file installation method may not work properly). Click here to download the FTDI driver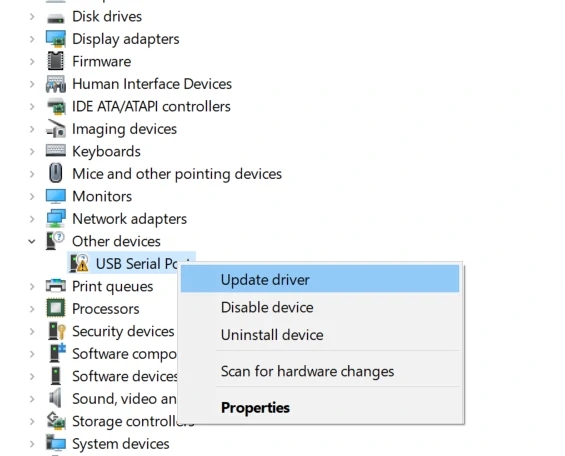
For MacOS users, before installation, please check System Preferences -> Security & Privacy -> General -> Allow apps downloaded from -> App Store and identified developers.

3. Download the Control Board
Refer to the Basic Environment Setup Guide to complete the IDE and M5Stack board manager installation, and select the M5StickCPlus development board.


4. Install Library Files
Dependency Library Installation: Refer to the Library Management Installation Guide to complete the installation of the M5StickC Plus driver library.


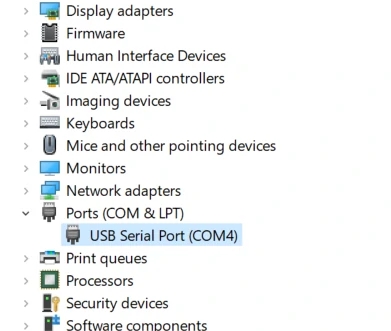
5. Port Selection
Connect the device to your computer via a USB cable. After completing the driver installation, select the corresponding device port in the Arduino IDE.

6. Program Compilation & Upload
Open the example program “Display” from the driver library, and click the upload button to automatically compile and upload the program.

The result is shown below:

Last updated
Was this helpful?