Seeed Studio XIAO RP2040 with Arduino
Product Link
Introduction
The Seeed Studio XIAO RP2040 is as small as the Seeed Studio XIAO SAMD21 but it's more powerful. On one hand, it carries the powerful Dual-core RP2040 processor that can flexible clock running up to 133 MHz which is a low-power microcontrollers. On the Seeed Studio XIAO RP2040 there is also 264KB of SRAM, and 2MB of on-board Flash memory which can provide more program to save and run. On the other hand, this little board has good performance in processing but needs less power. All in all, it is designed in a tiny size as small as a thumb(21x17.8mm) and can be used for wearable devices and small projects.
There are 14 GPIO PINs on Seeed Studio XIAO RP2040, on which there are 11 digital pins, 4 analog pins, 11 PWM Pins,1 I2C interface, 1 UART interface, 1 SPI interface, 1 SWD Bonding pad interface.
Seeed Studio XIAO RP2040 is compatible to the Seeed Studio XIAO expansion board.
Features
Powerful MCU: Dual-core ARM Cortex M0+ processor, flexible clock running up to 133 MHz
Rich on-chip resources: 264KB of SRAM, and 2MB of on-board Flash memory
Flexible compatibility: Support Micropython/Arduino/CircuitPython
Easy project operation: Breadboard-friendly & SMD design, no components on the back
Small size: As small as a thumb(21x17.8mm) for wearable devices and small projects.
Multiple interfaces: 11 digital pins, 4 analog pins, 11 PWM Pins,1 I2C interface, 1 UART interface, 1 SPI interface, 1 SWD Bonding pad interface.
Specifications
CPU
Dual-core ARM Cortex M0+ processor up to 133MHz
Flash Memory
2MB
SRAM
264KB
Digital I/O Pins
11
Analog I/O Pins
4
PWM Pins
11
I2C interface
1
SPI interface
1
UART interface
1
Power supply and downloading interface
Type-C
Power
3.3V/5V DC
Dimensions
21×17.8×3.5mm
Pinout

How to Use
Step 1. Download and Install the latest version of Arduino IDE according to your operating system
Step 2. Launch the Arduino application.
Step 3. Add Seeed Studio XIAO RP2040 board package to your Arduino IDE
Navigate to File > Preferences, and fill Additional Boards Manager URLs with the url below:
https://github.com/earlephilhower/arduino-pico/releases/download/global/package_rp2040_index.json
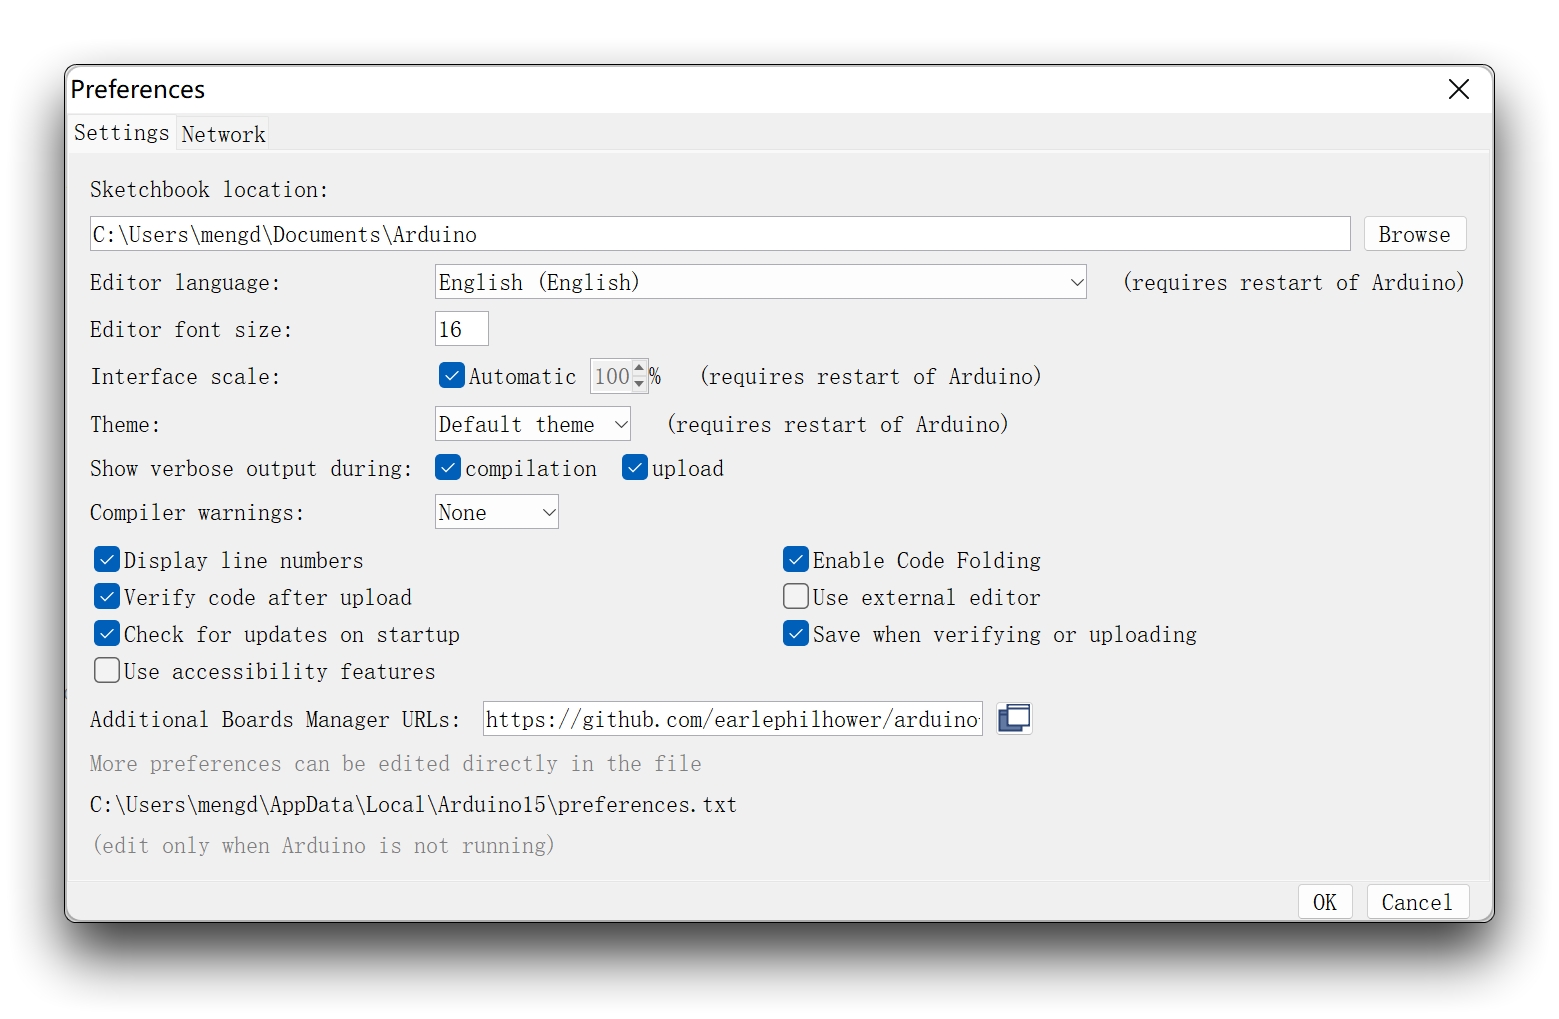
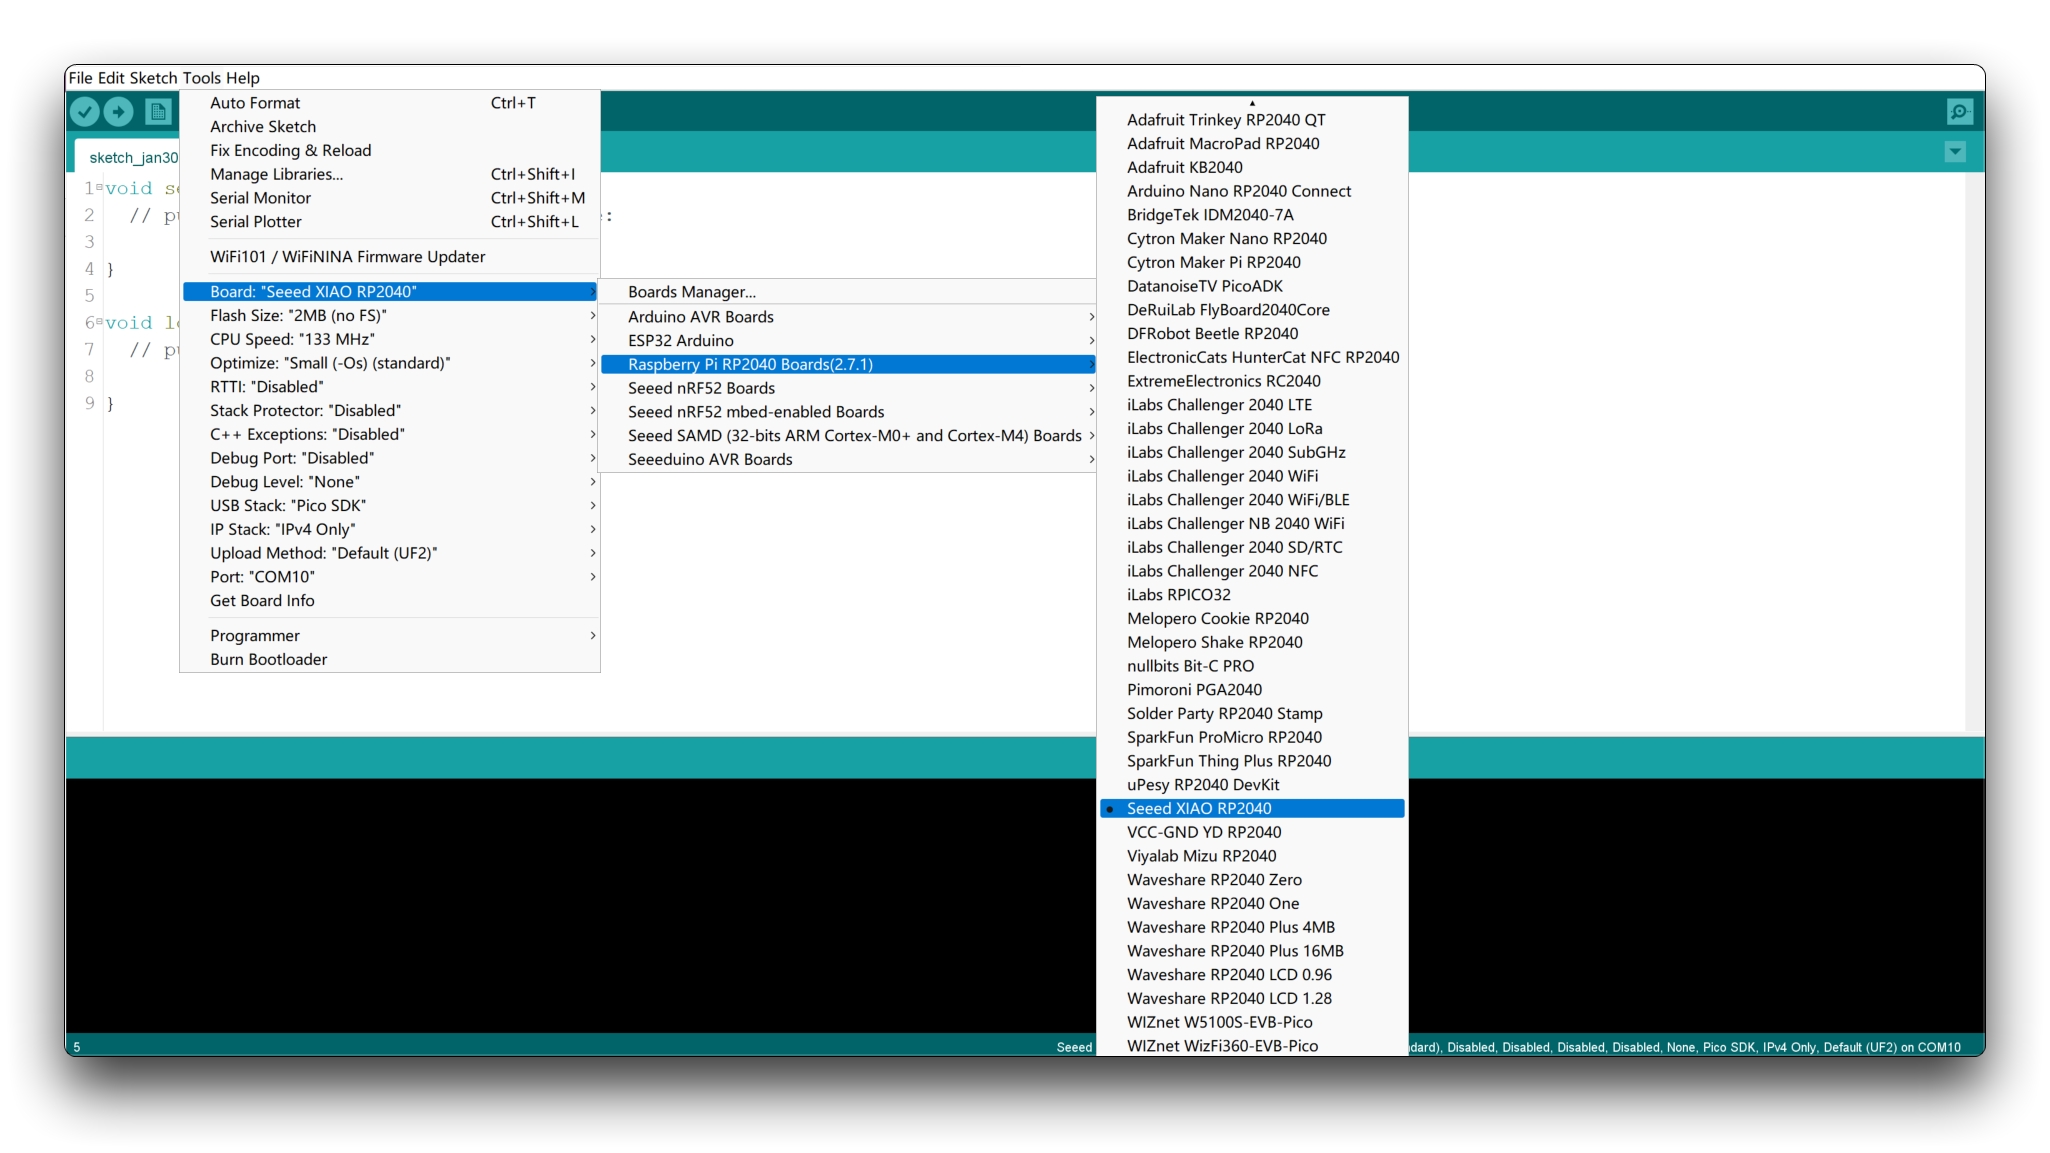
Navigate to Tools-> Board-> Boards Manager..., type the keyword "RP2040" in the searching blank. Select the lastest version of "Raspberry Pi Pico/RP2040" and install it.
Attention
The on-board package named Seeed XIAO RP2040 is no longer available, please do not download and use it!
Install the "Raspberry Pi Pico/RP2040" package, which includes the "Seeed XIAO RP2040" board.
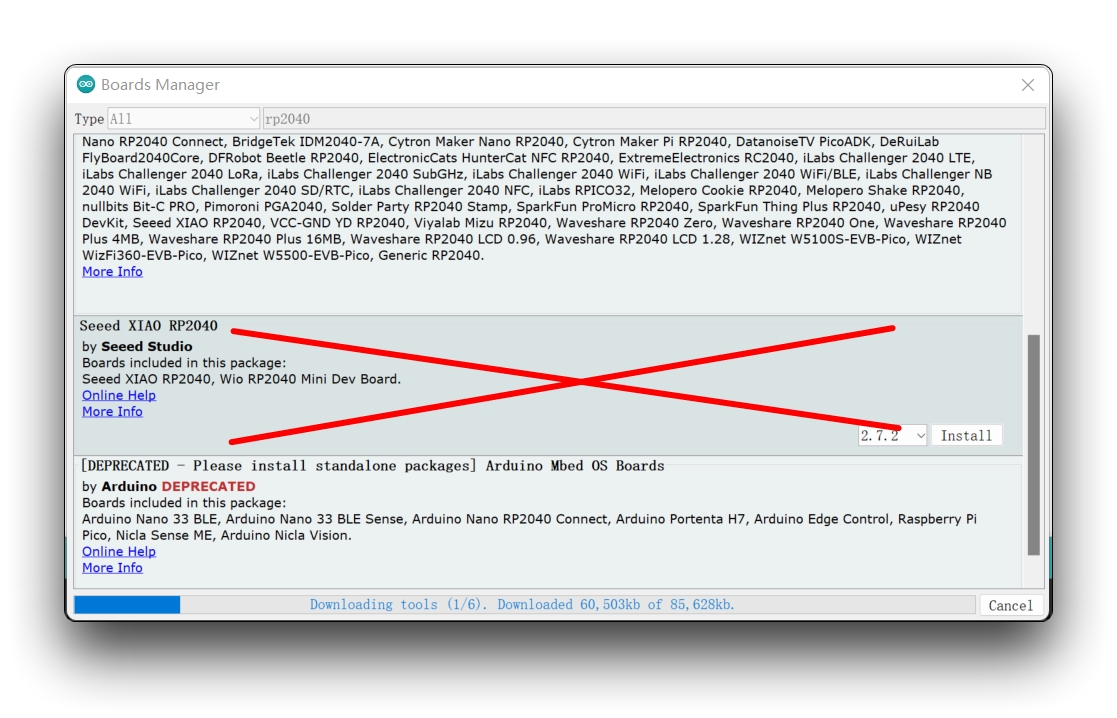
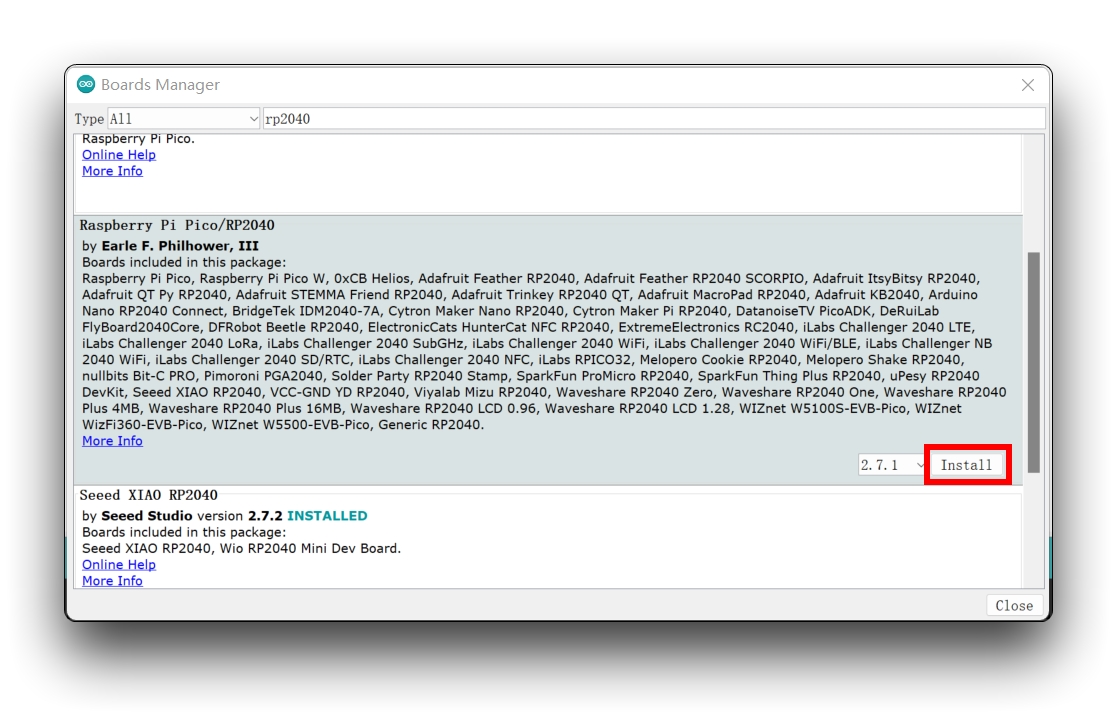
Step 4. Select your board and port.
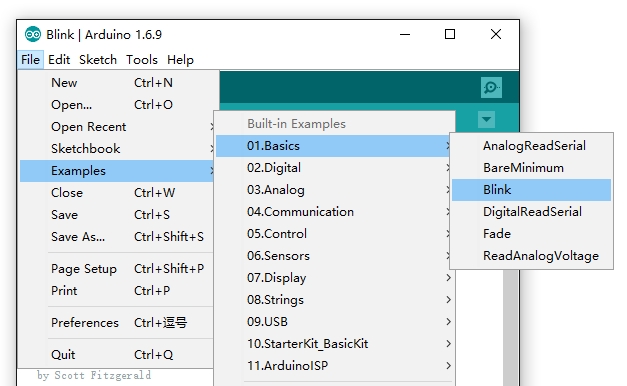
Step 5. Open the Blink example by navigating "File --> Examples --->01.Basics --> Blink"
Board
After installing the board package, navigate to Tools-> Board, find "Seeed Studio XIAO RP2040" and select it. Now we have finished setting up the Seeed Studio XIAO RP2040 for Arduino IDE.
Port
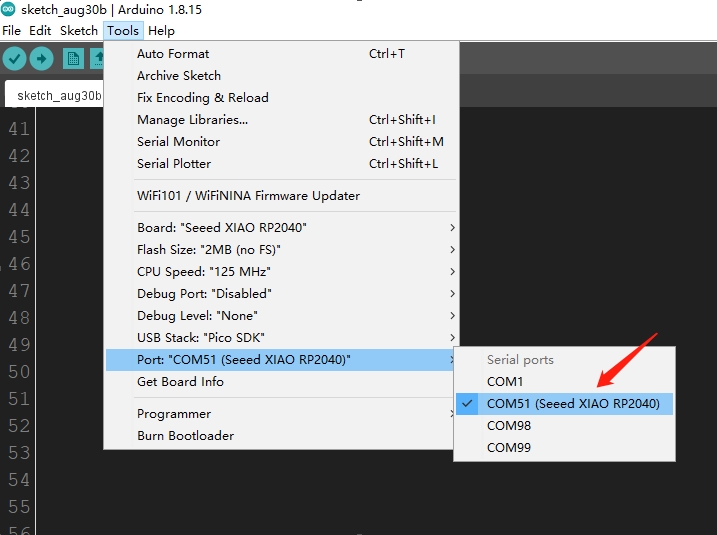
Navigate to Tools > Port and select the serial port name of the connected Seeed Studio XIAO RP2040. This is likely to be COM3 or higher (COM1 and COM2 are usually reserved for hardware serial ports). The serial port of the connected Seeed Studio XIAO RP2040 usually contains parentheses that are written "Seeed Studio XIAO RP2040".
Step 6. Click the Upload button to upload the Blink example code to the board.

Once uploaded, you should be able to see the pin 25 Green (USER) LED on the board blinks once a second. If it does, congratulations! This means the connection is successful and now you can explore more projects with the Seeed Studio XIAO RP2040!
Last updated
Was this helpful?
